Simple way for copying Blu-ray/DVD ISO to Chromecast for streaming

“I’m going to buy a Chromecast. But friends tell me that I can not play my backed up Blu-ray and DVD ISO files on Chromecast. Is it ture? If it is possible to do it, then how?”

You may know that you can just drag a local movie file to chrome browser’s address bar and cast it to the big screen with Google Cast the chrome extension via Chromecast. (Read Apple TV vs Chromecast comparison review) Unusually chrome the browser will have no trouble of handling kinds of video types, but not includes ISO files since ISO is not supported by Chromecast. As far as I know it’s not like that you can directly cast iso files to Chromecast for streaming, what you can do is to rip ISO from Blu-ray/DVD to digital movie files like MP4 and use the Chromecast’s local playback workaround to stream the movies to Chromecast. Then how to do it? What tool do we need?

stream iso to chromecast Simple way for copying Blu ray/DVD ISO to Chromecast for streaming


If you’re looking for ease-to-use ripping tool, check out Pavtube BDMagic- a top ISO to Chromecast Ripper, (Here is Top 5 Best Selling Blu-ray Ripper review) which aims to solve this problem by giving us the ability to remove disc protection and convert Blu-ray, DVD and ISO files to Chromecast compatible formats for casting the movies to Chromecast browser with ease in only 3 clicks. In addition, with the Subtitles option, you can freely choose your preferred subtitles for your ISO files.  If you are working on Mac OS X, please get BDMagic for Mac.

How to Transfer Blu-ray/DVD ISO images to TV via Chromecast

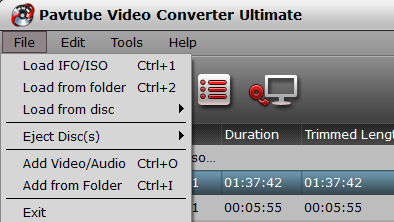
STEP 1: Import ISO source

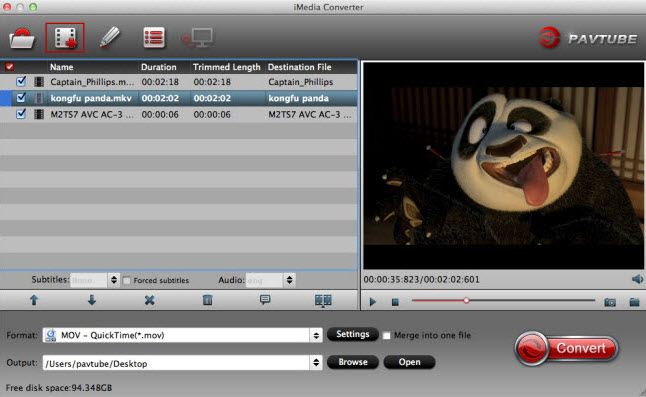
Launch the program Run ISO to Chromecast Ripper, click “Load file” to choose Load IFO/ISO file. It will recognize the ISO image file automatically so that you will not have to run virtual drive to mount the ISO any more.

blu ray to mp4 Simple way for copying Blu ray/DVD ISO to Chromecast for streaming

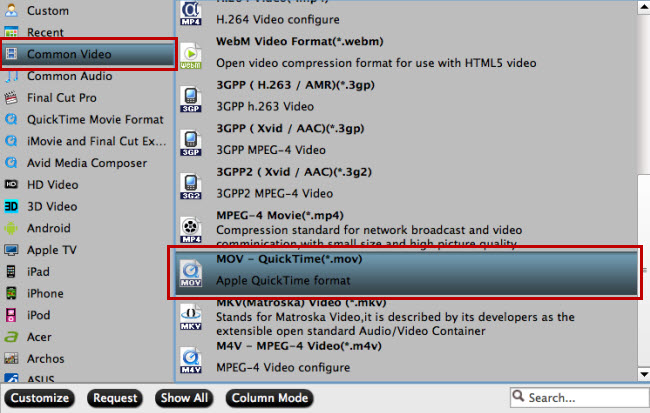
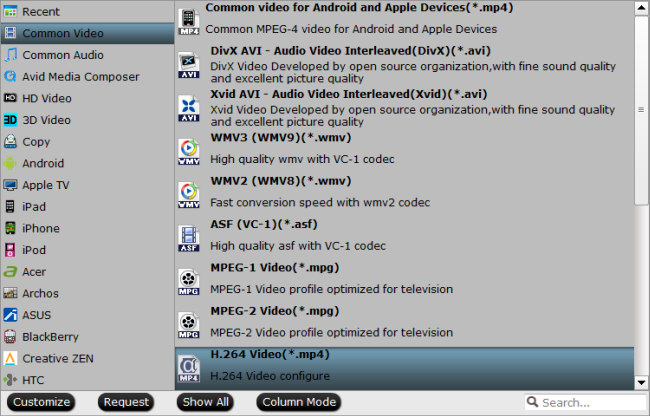
STEP 2. Choose output format

Click Format bar to get the format list and select a proper export format. For Chromecast, MP4 in “Common Video” column can be compatible. Also learn how to convert ISO files to play on Surface Pro 3Galaxy Tab 4 and 3D TV.

h.264 mp4 format Simple way for copying Blu ray/DVD ISO to Chromecast for streaming

Step 3. Start to rip BD/DVD ISO to Chromecast

When all the settings are OK, click “Convert” button to start converting ISO files to MP4 video. When the conversion is over, click “open” to locate the ripped video files. After the conversion, get the converted mp4 movie for movie casting.

Tutorial: How to Stream Converted iTunes Movies from the Chrome Browser to Your TV

*Download Google Cast extension for your Chrome Browser. The Google Cast extension enables you to find and play content on your Chromecast device from your Chrome browser. Once installed, the Cast Extension is located in the upper right hand corner on the Chrome toolbar.

*Open a new tab in chrome browser and drag the converted iTunes movies or TV shows to the address bar. Chromecast will cast them to your TV. Google Cast supports the following media facilities and types.

drage local movie to chrome browse Simple way for copying Blu ray/DVD ISO to Chromecast for streaming

Note: Both Mac users and Windows users can stream iTunes Movies with Chrome Browser.

IMPORTANT! To do this, you can enter file:///C:/ in Chrome’s address bar (or (file://localhost/Users/yourusername on a Mac), and then drag and drop the file into Chrome—or press Ctrl-O or Command-O—to show your system’s file browser. Hit the Cast button either before or after you choose the file you want.

For Google Cast extension, you can set the quality to High (720p) or Extreme (720p high bitrate) to get a reasonable video quality on a full HD TV.

Source: http://open-mobile-share.com/copy-blu-ray-dvd-iso-to-chromecast/

Related Articles:

Full Copy Blu-ray/DVD to NAS | Backup Blu-ray/DVD to Home Server

Backup Blu-ray/DVD to WD My Cloud Mirror | Backup Blu-ray Movies to Windows 7

Copy Blu-ray/DVD to NAS for WD TV Media Player | Stream ISO images to play on TV

Backup Blu-ray/DVD to Synology DS416/DS216 | Rip and Copy Blu-ray to Surface Pro

Rip and Backup Blu-ray/DVD to USB Flash Drive | Backup Blu-ray/DVD to Drobo DAS Device

Backup Blu-ray DVD Movies to DS916+/DS116 NAS | Copy Blu-ray Movies to Sony Xperia Z6

Lossless Copy Blu-ray/DVD to MKV for JRiver | Backup Blu-ray/DVD to NetGear ReadyNAS

Backup Blu-ray/DVD/ISO to Surface Book | Backup Blu-ray/DVD to Seagate NAS HDD

Pavtube 2017 Mother’s Day Up to 78% Off Blu-ray/DVD/Video Tools

The 2017 Mother's day will come in just few days, there are many different ways to celebrate this great day with your Mom. You can either send a delicate card with all your best wishes, prepare a delicious super for her or a bouquet of beautiful flowers to put a smile on her face. But for Mother who are media enthusiasts, gifts such as a Disc Conversion software or video Conversion tool to let her get full access to all her favorite movies, TV shows, music video, etc anywhere at anytime as she like would be your first choice.


Wish to get the best Disc conversion and Video Conversion software with a big deal for your dear mother, just feel free to join Pavtube 2017 Mother's special offer at our Facebook page- Up to 78% off Blu-ray/DVD/Video ripping conversion tools including:
- 50%-55% off discount for Blu-ray/DVD/Video Ripping tool
- Only $9.9 for Video Conversion Tool - 50%-55% off discount for Blu-ray/DVD/Video Ripping tool

Wish to get a digital copy of the movies on the Blu-ray disc or old DVD disc so that your Mother can conveniently view the movies on computer, smartphone, tablets, game consoles, TV, etc without touching the original disc. You can easily achieve that with Pavtube Blu-ray and DVD Ripping software, which can powerfully and automatically bypass the digital copy protection and region code from Blu-ray or DVD disc, so that you can easily make a copy or backup of the data on the disc without any limitation. Detailed discount information are below:


Windows Products:

Pavtube BDMagic?| Original Price: $49 Now: $24.5 | Free Trial?| Buy Now

Pavtube ByteCopy? | Original Price: $42 Now: $21 | Free Trial?| Buy Now

Pavtube DVDAid? | Original Price: $35 Now: $17.5 | Free Trial?| Buy Now


Mac Products:

Pavtube BDMagic for Mac?| Original Price: $49 Now: $24.5 | Free Trial?| Buy Now

Pavtube ByteCopy for Mac?| Original Price: $49 Now: $21 | Free Trial?| Buy Now

Pavtube DVDAid for Mac?| Original Price: $35 Now: $17.5 | Free Trial?| Buy Now


For Mother who are looking for a one stop solution to fix all media types including Blu-ray disc, DVD disc or also digital video entertainment issue, you are highly recommended to save more money get our media conversion tool - Pavtube Video Converter Ultimate for Windows/Mac.


Pavtube Video Converter Ultimate
Original Price: $49 Now: $24.5
Free Trial?| Buy Now


Pavtube iMedia Converter for Mac
Original Price: $49 Now: $24.5
Free Trial?| Buy Now


For professional frame by frame trimming, merging or splitting of your Mother's footage, please switch to Pavtube Media Magic for Windows/Mac.

Pavtube Media Magician for Windows
Original Price: $45 Now: $20.25
Free Trial?| Buy Now


Pavtube Media Magician for Mac
Original Price: $45 Now: $20.25
Free Trial?| Buy Now

- Only $9.9 for Video Conversion Tool

Have captured some great moment of your deal Mother'?daily life, you wish may to do some simple editing or professional post workflow before sharing them with your Mother or people around the world. Never mind, with Pavtube's powerful yet simple to use video conversion tool, you can trim,crop, add watermark, apply effect, change picture color effect, flip, rotate, add external subtitle, etc, or product the best editing format for professional editing software like Premiere Pro CC, Davinci Resolve, Avid Media Composer, Final Cut Pro, etc. Now, save big by picking any of your favorite video conversion tool listed below for only $9.9


Windows Products

Pavtube Video Converter?| Original Price: $35 Now: $9.9 | Free Trial?| Buy Now

Pavtube HD Video Converter?| Original Price: $29 Now: $9.9 | Free Trial?| Buy Now

Pavtube MXF Converter?| Original Price: $29 Now: $9.9 | Free Trial?| Buy Now

Pavtube MXF MultiMixer?| Original Price: $45 Now: $9.9 | Free Trial?| Buy Now

Pavtube MTS/M2TS Converter?| Original Price: $29 Now: $9.9 | Free Trial?| Buy Now

Pavtube MKV Converter?| Original Price: $29 Now: $9.9 | Free Trial?| Buy Now

Pavtube FLV/F4V Converter?| Original Price: $29 Now: $9.9 | Free Trial?| Buy Now

Pavtube DVD Creator?| Original Price: $9.9 Now: $17.5 | Free Trial?| Buy Now


Mac Products

Pavtube Video Converter for Mac?| Original Price: $35 Now: $9.9 | Free Trial?| Buy Now

Pavtube HD Video Converter for Mac?| Original Price: $35 Now: $9.9 | Free Trial?| Buy Now

Pavtube MXF Converter for Mac?| Original Price: $29 Now: $9.9| Free Trial?| Buy Now

Pavtube iMixMXF?| Original Price: $9.9 Now: $17.5 | Free Trial?| Buy Now

Pavtube MTS/M2TS Converter for Mac?| Original Price: $29 Now: $9.9 | Free Trial?| Buy Now

Pavtube MKV Converter for Mac?| Original Price: $29 Now: $9.9 | Free Trial?| Buy Now

Pavtube FLV/F4V Converter for Mac?| Original Price: $29 Now: $9.9 | Free Trial?| Buy Now

Pavtube DVD Creator for Mac?| Original Price: $45 Now: $17.5 | Free Trial?| Buy Now

Best Free Audio Converter 2017

I need a free audio converter for Web, any recommendation?

Can’t play audio on players? Or want to convert audio to another audio? Just get a best free audio converter at hand. In case you are wondering the audio converters that you can use, this article recommends the best 5 free audio converters.

1. Free DVD Video Converter Ultimate (Highly Recommend)

As a free audio/video/DVD converter ultimate, Free DVD Video Converter Ultimate also is a leader of free audio converter. It can convert any audio, video, DVD to various audio like MP3, WAV, W4A, OGG, AC3, WMA, AAC, FLAC and more. It can convert audio with only 3 simple formats keeping the high audio quality. Meanwhile, it provides large amounts of DIY features including trimming, cropping, splitting, adding subtitle file, adding video effect, etc. to extend your own movie enjoyment. You can free download it to convert audios, videos, DVDs to any formats you need.

  • Convert audio/video/DVD to AVI, WMV, MPG, MOV, MKV, MP3, M4A, AC3, WMA, AAC, …
  • Batch convert from DVD disc, DVD folder, DVD IFO/ISO, MP4, MOV, M4V, AVI, WMV, MKV, MP3, WMA, etc.
  • Basic video editing functions: split, merge, trim, crop, add watermark, adjust video effect, edit audio and insert subtitles.
  • Easy Operation super faster conversion speed with excellent quality.
  • Supported OS: Windows 2003/XP/Vista/Windows 7/Windows 8/Windows 8.1/Windows 10

2.  Switch Sound File Converter

Another free audio converter is called Switch Sound File Converter. It supports batch conversions and whole folder imports, as well as drag and drop and lots of advanced settings.

You can also use Switch Sound File Converter to extract audio from your video files and CDs/DVDs, as well as capture audio from a live audio stream from the Internet.

3. Free Studio

Free Studio is actually a group of several programs. Just click Convert from the main menu, and then choose the Free Audio Converter option to open the audio converter tool.

Free Studio is very easy to use and lets you choose an output quality, fill out audio tags, automatically shutdown the computer after converting files, and import files from the Windows right-click context menu.

4. Free MP3 WMA Converter

This is one of the few video/sound encoding tool that can use four threads to exploit quad-center multi-processor systems. You can modify the maximal amount of threads in the settings. In this way, it is conceivable to take advantage of high-speed multi-conversion even on an eight-core framework. Apart from converting the single sound file into the different format in bulk, you can combine numerous records into one bigger sound file.

5. Pavtube Video Converter Ultimate (Powerful)

Pavtube Video Converter Ultimate is the best Audio/BD/DVD/Video solution for Windows users to backup BD/DVD, compress disc and transcode video clip to almost all popular video and audio formats. This Video Converter Ultimate can convert Audio/BD/DVD/Video to any formats you need like MP3, AAC, AC3, MP4, MOV etc and play on iPad, iPhone, Android phones, Windows phones, game consoles, HD media players, and more. Besides, it is a professional video editing software to assist users with trimming, cropping, splitting, merging, attaching subtitles...to create your own videos.

Pros:

Convert audio with fast speed

Support 20+ audio formats conversion

Rip DVD, Blu-ray, convert video

Source:https://media-playback.jimdo.com

Related Articles:

Top 4 Free WMV Players for Mac | Best 10 Free 3D Video Maker

Choose the Right Video Converter  | Best 5 Video Converter Reviews

Best Windows 10/8.1/8 Video Converter  | Best Free MP4 Video Joiner

Top 10 Free HEVC/H.265 Converters | Best 2D to 3D Converter

Top 4K Video Editor to Play/Edit/Convert 4K | Top 7 Online Video Converters

Best File Compression Software | Top 3 Free WMV DRM Removal Tools

Top 10 4K Video Converters | Top 5 Best HD Video Converters

Best 4K Video Converter Software  | Top 5 Free Video Converters 

Edit iPhone videos in Windows Movie Maker

You may encounter some weird problems when import and open iPhone videos in Windows Movie Maker like no picture, video preview lag, render slowly or even program crashed. The reason is that iPhone videos are recorded in .MOV format encoded with H.264, which can’t be recognized by Windows Movie Maker. This tutorial will quickly walk you through how to drag and drop iPhone videos including iPhone 7 videos to Windows Movie Maker timeline for editing without hassle.

As is known, the iPhones (including iPhone 7, iPhone 7 Plus, iPhone 6, iPhone 6 Plus, iPhone 5S, iPhone 5C, iPhone 4S, etc.) record videos in .mov format. However, the MOV is not supported natively by Windows Movie Maker. So you need to convert the MOV to Windows Movie Maker compatible format like WMV before editing. ctually, it’s not as difficult as you imagine. What’s need is a just a common video converter like Pavtube Video Converter Ultimate. It supports creating high quality WMV video for your Windows Movie Maker on Windows 10/8/7/XP/Vista, no matter what’s the format of your iPhone video or other source video files.

Hot features of Pavtube Video Converter Ultimate

  • Convert iPhone MOV/MP4 video to Windows Movie Maker supported video with 3 simple steps.
  • Convert DVD, Blu-ray, ISO, MOV, MP4, MKV, H.265, XAVC, MXF, MTS etc to Windows Movie Maker WMV format.
  • Convert iPhone video to PS3, PS4, mobile phones, Android, iPad, iPhone, Apple TV, NLE and other popular end devices.
  • Basic video editing functions: split, merge, trim, crop, add watermark, adjust video effect, edit audio and insert subtitles.
  • United free audio converter and video to image converter.
  • Batch conversion and super fast conversion speed.
  • Easy-to-use iPhone Video Converter with simple clear interface.

Free download iPhone to Windows Movie Maker Video Converter

Now Convert your iPhone video to a editable format for Windows Movie Maker

Step 1. Add iPhone video files

First download and install Pavtube Video Converter Ultimate. When complete, start this program from “Convert” menu or Windows desktop.

Step 2. Set WMV as the output format

Click the format icon on the right to open the format list, and select “WMV” as the output format from Common Video or HD Video. If you want to make changes to the video settings like resolution, bit rate and other settings, click the “Settings” button at bottom.

Step 3. Convert iPhone video to Windows Movie Maker

When everything is ready, click the “Convert” button and all the imported iPhone video files will be converted to WMV format by this iPhone video to Windows Movie Maker Video Converter.

Read More:

Edit 4K Video with Windows Movie Maker | Edit DJI Phantom 4K to Windows Movie Maker 

Edit OBS video in Windows Movie Maker  | Edit MP4 to Windows Movie Maker

Edit MTS/M2TS to Windows Movie Maker | Edit WMV in Windows Movie Maker 

Edit GoPro video in Windows Movie Maker | Edit CamStudio video in Windows Movie Maker

Edit Fraps video in Windows Movie Maker | Edit Android video in Windows Movie Maker

Sony M2TS to Windows Movie Maker | Canon Vixia MTS to Windows Movie Maker

How to Edite iPhone 7 (4K) Video in Adobe Premiere Pro

iPhone 7 video to Adobe Premiere Pro issues

Q1: Having trouble with iphone 7 videos with premiere pro CC

I can’t take my iPhone 7 videos (.mp4) and load them into the timeline. Any suggestions why this is happening?

Q2: iPhone 7 Video – Serious Sync Issues Eliminate Premiere as a tool

I was excited to see how great the video is from the iPhone 7. I have taken one hour 4k videos of lectures that look great. However, when pulled into Premiere (CS5), the sound goes out of sync to the point that it is unusable after about seven minutes. I have checked the original file (.MP4) using QT – it plays perfectly. Indeed, I can trim and split the file using QT and I know that creating a bunch of small videos to link in Premiere would be a solution of sorts.

Why can’t Import iPhone 7 MP4 video into Adobe Premiere Pro?

Can’t import your iPhone 7 MP4 file to Adobe Premiere Pro CS4/CS5/CS3/CS6? The iPhone 7 records in MPEG-4 and outputs its files as .MP4 files (the container). Files are compressed using the h.264 codec (as opposed to AAC or Xvid and DivX usually found in .AVI containers). So the files you are getting out of iPhone 7 are suited to be delivered as is, which is usually not what you want. So sometimes our iPhone 7 MP4 file codec isn’t compatible with Adobe Premiere. To easily solve your problem, you can convert this iPhone 7 MP4 video to other Premiere friendly movie format like MPEG-2, FLV and more (Note: it applies to all kinds of Adobe Premiere including Adobe Premiere Pro, Adobe Premiere Pro CS3/ CS4/ CS5/ CS6).

Solution for Edit iPhone 7 (4k) Video in Adobe Premiere Pro perfectly

To fulfill your task, you can just get Pavtube HD Video Converter for Mac, a powerful video converter, editor. It can easily transcode your iPhone 7 .mp4 videos to Adobe Premiere Pro best editable .mpeg-2 format for ncie editing. Besides, it also can convert other iPhones video like iPhone 6s/6s Plus/5s/5s Plus etc video to Adobe Premiere Pro formats powerfully. In addition to transcoding iPhone 7 .mp4 video to Premiere supported videos with optimized settings while keeping the video quality, the all-in-one and easy-to-use toolkit can convert all other popular SD/HD video formats like AVI, MXF, WMV, MKV, FLV, MTS, VOB, H.265 etc. to Adobe Premiere Pro, iMovie, FCP natively supported video formats on Mac OS X (macOS Sierra, El Capitan Yosemite, Mavericks, Lion included) with fast encoding speed.

For Windows users, please get help from Pavtube HD Video Converter Download the program and learn how to convert iPhone 7 files to Adobe Premiere Pro format.

(Mac version)

 (Windows version)

Steps on converting iPhone 7 MP4 footage to supported MPEG-2 MPG for Adobe Premiere Pro CC

Step 1. Click “Add File” button to import the unsupported iPhone 7 MP4 video file. Or you can also drag your MP4 video directly to the main interface of this MP4 to Premiere Converter.

Step 2. When you come to the output list, we suggest you to drop down the list and find the ‘Adobe Premiere Pro’ column and choose the ‘MPEG-2 MPG’ as the nice one. Or other suitable output format is also available.

Tips: Advanced functions

A. Click the “Edit” button to open the Video Edit window to achieve editing MP4 like trim, crop, image, watermark, effect, subtitles and rotate and etc in the corresponding editing pane.

B. Click the “Setting…” button to open the Advanced Settings window to adjust the output video codec, resolution, bitrates, frame rate, aspect ratio, audio codec, channel, volume and etc in the advanced tab.

As soon as we have finished all the preparation work there, just get back to the main interface to click the ‘Convert’ icon to get the work started. After transferring the files to Adobe Premiere CC as usual, we can edit the recordings in Adobe which shot from iPhone 7 and iPhone 6s/6s Plus/5s/5s Plus. Have a try!

Read More:

Play iPhone 4K video on TV | Play 4K XAVC S on Plex

Edit 4K video on iMovie | 4K Video to Cyberlink PowerDirector

Import Media Files to Adobe Premiere Pro

Import MXF OP-Atom Files to Premiere Pro 

Import Canon XC10 XF-AVC MXF 4K/1080p to Premiere Pro 

Import/Edit Canon XF100 MXF to Adobe Premiere Pro

Import Samsung NX1 H.265 recordings to Adobe Premiere Pro 

Import/Edit Blackmagic 4K Ultra HD Prores with Adobe Premiere Pro CC

Upload 4K Video on YouTube/Facebook/Vimeo

Export 4K from Premiere with Best Settings for YouTube/Vimeo

Compress and Convert 4K video to iPhone 7/iPhone 7 Plus

Does Apple QuickTime Player support h.265 on Mac OS Sierra/El Capitan?

H.265 or High Efficiency Video Coding (HEVC) is the latest generation video compression standard which compresses a video file into smaller package, making it easier to store or transmit. Today is the turn of HEVC. However, many devices and applications like QuickTime player are still need time to support the new codec. Do you have some HEVC/H.265 files saved on your computer, and wonder how to make H.265 files playable in QuickTime player on Mac OS Sierra/El Capitan? You’ve come to the right place.

Since QT player can work with H.264 MP4, MOV, M4V videos well, to get H.265 files playable in QuickTime Player, a quick fix is to convert H.265 to QT Player readable format for playback easily.

One of the best Yosemite/Mavericks H.265 Converter from the market so far is Pavtube iMedia Converter for Mac, which is recentlyupgraded to support H.265 encoding and decoding and it can be taken as a completely professional H.265/HEVC encoder, decoder, player and editor.

With it, you can convert H.265 to QuickTime player friendly H.264 MP4, MOV, M4V video on Mac OS Sierra/El Capitan with quality loss effortlessly. And it is available to customize the output resolutions to any size the users want and edit video file with trim, crop, add watermark, insert subtitles, split, merge and other options before conversion. What’s more, it also supports convert non-H.265 video files to H.265 for storage and playback. Download the program and move on to see how to convert H.265 videos for QuickTime player on Mac OS Sierra/El Capitan .

Download H.265 to QuickTime player converter:

Tutorial: Converting H.265/HEVC to QuickTime player friendly format

Step 1. Add H.265 source

Install and run this best H.265 Video Converter. Click add button to import the H.265 files to the program.

Windows Video to Mac Mini Converter

Step 2. Choose QuickTime Player friendly format

Click the Format menu, select QuickTime Player friendly format as your output video format. There, you can take H.264 MP4, M4V, MOV as your output video format.

Choose Quicktime MOV Format

Tip: In case the default settings do not fit your requirement, you can click “Settings” button and enter “Profile Settings” panel to adjust video size, bit rate, frame rate, sample rate and audio channels.

Adjust QT MOV profile settings

Step 3. Start conversion

Finally click the Convert button to begin encoding H.265 to QuickTime player format.

After the short conversion, go to the output folder and drop the converted files into QuickTime player. Once all this is done, add your converted videos to QuickTime player.

Additional Tip:

Want to find another solution to play H.265(HEVC) videos? Just get the best QuickTime Alternative for Yosemite/Mavericks.

Here is a list of the top 2 options:

1. DivX Player

DivX player is another robust HEVC video file player. It is an award winning software that offers HEVC playback. It offers high-quality playback of movies, TV shows. It supports almost all the popular formats like AVI, DIVX, MKV, MP4 and more. By using its DivX Media Server one can stream music, video and photos to any DLNA-compatible device at home like PS3, XBOX, or Samsung Galaxy line of product. With the Stream To feature in player user can also control which device they can stream their videos to.

2. VLC Media Player

Another player that can play HEVC file is the VLC Media Player, which is a free and open source player and framework. It supports a wide range of multimedia files. It can also play DVDs and various streaming protocols.

Now you can experience the H.265/HEVC videos on your QuickTime Player on Mac OS Sierra/El Capitan  freely!

Continue Reading:

Encode Blu-ray to H.265 MP4 | Play H.265/HEVC on Mac

Play H.265/HEVC to PS4 | Play H.265 on LG TV

Edit H.265/HEVC with FCP X | Edit H.265/HEVC in Premiere Pro

HEVC H.265 Encoder for NVIDIA GPU | Encode H.265 with FFMPEG

Encode HEVC/H.265 MP4 to AVC/H.264 MP4 on Mac

Encode/Decode H.265 video for iPhone/iPad/Apple TV on Mac

How to Trim Movies for Taking out Extra Scenes?

Movies bring great entertainment for most people all over the world. A movie has an ability of influencing our lives whether negatively or positively. In some movies, there may be some touching scenes that you want to cut out to upload to YouTube or Vimeo to share with your friends. But to common people, they maybe don’t know how to trim movies to get the video clip they want. Here, I will share my some experience on trimming movies for taking out extra scene.

For a non-IT savvy people like me, a user-friendly video trimming tool is needed to trim movies. Pavtube Video Converter Ultimate is the best choice, I think, after I attempted many video softwares. It can accurately trim video length to take out the extra scenes so as to get desired video clip from Blu-ray/DVD/4K/HD/SD movies. And it can accept MP4, MKV, AVI, FLV, MOV, etc format movie to trim video footage and change the video clip to another popular format if necessary. For better looking, you can crop the black area of the video clip. (Read 5 reasons to choose Video Converter Ultimate). If you also want to try this brilliant app, download it in the below:

Free download and install
          

Other Download:
- Pavtube old official address: http://www.pavtube.cn/blu-ray-video-converter-ultimate/
- Cnet Download: http://download.cnet.com/Pavtube-Video-Converter-Ultimate/3000-2194_4-75938564.html

How to trim movies for taking out extra scenes?

Step 1: Add source movie to the app

Click “File” menu, and select "Add Video/Audio" or "Add from folder" to import source movie files.


Step 2: Select output format

If your source movie is Blu-ray/DVD and other unusual format, you can change it to a popular video format in “Format”


Step 3: Trim movies to take out extra scenes

Click “Edit” to find “Trim” icon. This icon allows you to decide where to start and where to end when converting the selected movie, so that unwanted scenes will be cut out after conversion.


Tip: The "Crop" facility enables you to get rid of the black edges and unwanted area of the image. Crop video by dragging and dropping the crop frame Simply move your mouse cursor to drag and adjust the green frame to desired position.


Step 4:  Start to trim movies 

Clicking the Convert button on main interface, you can go to Conversion window to start to trim movies for taking out extra scenes.

Now, you get a video clip from the source movie. As you seen, it is easy to trim movies to take out extra scenes with this program. Just try! Also you can look here if you want to trim blu-ray and DVD movies on Mac.

Source: Best way to Trim Movies for Taking out Extra Scenes

Related Article:

Edit movies on the timeline | Lossless Trimming AVCHD Video

Trim and convert HD recordings for HD TV | Edit 4K Video with iMovie on Mac

Trim MTS without re-encoding on Mac | Play 4K Video on PS4 Pro

Trim Sony HDR-XR160E MTS | Split a large video file into several small files

Top 5 Apps to Split or Merge Video Files on Mac | Split Phantom 4 4K video