Since Google unveiled the Pixel C tablet, more and more users have got this excellent tablet. Google Pixel C runs Android 6.0 Marshmallow OS, it uses Nvidia’s Tegra X1 chipset with a quad-core CPU and Maxwell GPU, paired with 3GB of RAM. This tablet has a 10.2-inch display, and the resolution of the screen is 2560 x 1800 and a density of 308ppi. With Google Pixel C tablet you can get vivid images, so it is ideal for you to copy movies to Pixel C for watching. But if you have Blu-ray movies, then you will find it is hard to play your Blu-ray movies on Google Pixel C. So here I will share you an easy way to help you play Blu-ray on Pixel C tablet without limitations.Due to the copy protection of the Blu-ray, it is difficult to copy Blu-ray to Google Pixel C for watching directly. The best way is to use a Blu-ray ripper to rip Blu-ray to Google Pixel C supported formats, like MP4, which is the most compatible format for Google Pixel C. Pavtube BDMagic is no doubt the best choice. As it could output various video and audio formats, like MP4,H.265/HEVC, MKV, MOV, DivX, AVI, MP3, FLAC etc, so that you can share movies on not only Google Pixel C, but also numbers of popular media players,like Apple TV, LG 3D TV, iPad, iPhone, Android smartphones, PS4 and more. Besides, you can set codec, size, bitrate, etc to control the quality and size of the movies.(review) Here is a guide.Steps to rip Blu-ray movies to MP4Step 1. Load Blu-ray moviesStart up the program on your computer. On the main interface of the program, click "File" > "Load from disc" to input Blu-ray disc to the program.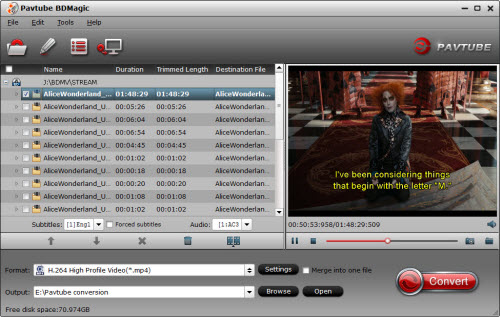 Step 2: Set output formatFrom "Format" drop-down bar, select Google Pixel C supported format, for example, you can choose "HD Video" > "H.264 HD Video(*.mp4)" as the output file format
  Tips: In the “setting”, you can set codec, size, bitrate, etc to control the quality and size of the movies on your own need.Step 3: Start to convertGo back to the main interface, press right-bottom "Convert" button to convert Blu-ray to MP4. When the conversion is completed, you can easily transfer converted files from your computer to Google Pixel C.Mac user can use Pavtube BDMagic for Mac to realize the conversion. And it has updated to support the newest Mac OS X El Capitan.To get the app at a big discount, just in Pavtube Christmas Coupon.Related Articles:
DivX is a high-compression video codec used for digital video distribution. It compresses video to a small file size with minimal loss in quality, and the video resolution can be up to 1080 HD. DivX can be supported by many media players, while there are a few video editing programs can support it. So if you want to edit your DivX video on the video editing program, you’d better convert the DivX to a more compatible format for video editing program. ProRes is no doubt a great choice for you, as it can support many video editing program, like FCP and Premiere.You may be curious about how to convert DivX to ProRes, so next part will show you the way on Windows 10. First of all, a video converter is necessary for you. And here strongly recommended you Pavtube Video Converter Ultimate. Because, it can convert DivX to ProRes, such as ProRes 422, ProRes 4444 for FCP X, FCP 7, Premiere Pro CS5/CC. What is more, you can also use it to simply customize output files with provided practical video editing features, including: trim video length, crop video size, split large video into segments, add watermarks, adjust video effect. (review)Here is a guide to help you convert DivX to ProRes on Windows 10.Free download and install
 Other Download:- Pavtube old official address: http://www.pavtube.cn/blu-ray-video-converter-ultimate/- Cnet Download: http://download.cnet.com/Pavtube-Video-Converter-Ultimate/3000-2194_4-75938564.htmlSteps to convert DivX to ProRes on Windows 10Step 1. Load DivX video.Click "File" drop-down option to locate and select the DivX video.
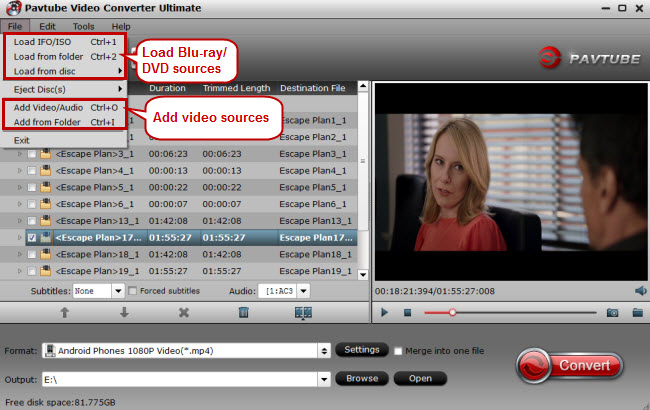 Step 2: Set output format.Go to "Format" bar, you can choose the format according to your video editing program and the app provides you optimized preset format for mainstream media players and video editing programs. For example, if you want to edit your DivX video on the Final Cut Pro, you can choose “Apple ProRes 422/4444” > “Final Cut Pro”.
 PS. In the “Edit” iron, it provides practical video editing features, including: trim video length, crop video size, split large video into segments, add watermarks, adjust video effect etc.Step 3: Start to convertGo back to the main interface, hit right-bottom "Convert" button to convert DivX to ProRes for your video editing program on Windows 10.Mac user can use Pavtube iMedia Converter for Mac, and all the steps are the same. (It has updated to support the newest Mac OS X El Capitan.)Now, you can enjoy the lowest price for celebrating the coming Christmas.Related Articles:
“Recently, iPad Mini 4 becomes popular around my friends and my colleagues, so, I decided to buy one finally. However, I do not know that iPad Mini 4 can’t support MKV format as source video, and I have downloaded many Christmas MKV movies in my PC. So, can anyone tell me how to play my downloaded Christmas MKV movies on iPad Mini 4. Besides, I am not a computerman, so I really need a simple way to help me solve the problem.” The problem was asked from VideoHelp. If you have the same issue, read the article and it will solve your problem.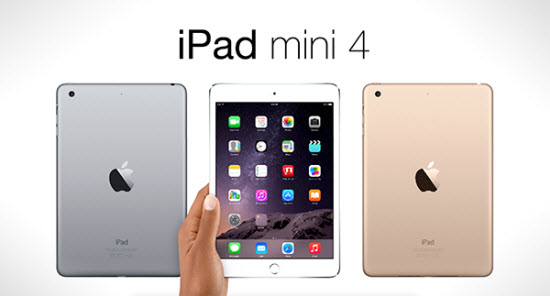 No matter the iPad mini 4 or the iPad mini 3/2/1, they all do not support the MKV format. Therefore, if you want to play downloaded Christmas MKV movies on iPad Mini 4, you have to convert MKV to iPad mini supported formats, such as, m4v, mp4, mov etc.Pavtube iMedia Converter for Mac is highly recommended utility to fulfill the task by converting HD MKV movies to iPad Mini 4/3/2/1 compatible MP4, MOV, or M4V on Mac. Besides iPad Mini 4, you will also allowed to convert HD MKV movies to play on other popular portable devices like Samsung Galaxy Tab S2, Galaxy Note 5, Galaxy S6 Edge, iPhone 6s/Plus, iPad Pro, HTC One M9+, HTC Desire 626, Apple TV 4, PS4 and more with just a few clicks. Now, the app hasupdated to support the newest Mac OS X El Capitan, and you can get a big discount in Pavtube Christmas Coupon.PS. Windows user can use Pavtube Video Converter Ultimate to realize the conversion to play your downloaded Christmas MKV movies on iPad Mini 4/3/2/1. Free download and install
 Other Download:- Pavtube old official address: http://www.pavtube.cn/imedia-converter-mac/- Cnet Download: http://download.cnet.com/Pavtube-iMedia-Converter/3000-2194_4-76177788.html Steps to convert MKV to MP4Step 1. Load downloaded MKV movies to the appClick "File" > "Add Video/Audio" or "Add from folder" to import source video files to the program.
 Step 2: Set output format in MP4Set output video file format for Apple iPad Mini 4/3/2/1. Here you can go to “Format” > “iPad” and then select "iPad > iPad Mini HD Video (*.mp4)" respectively for your iPad Mini. Tips: Click the "Pencil" like icon on the main interface of the program to open the "Video Editor" window, then start the fantastic video editing trips.
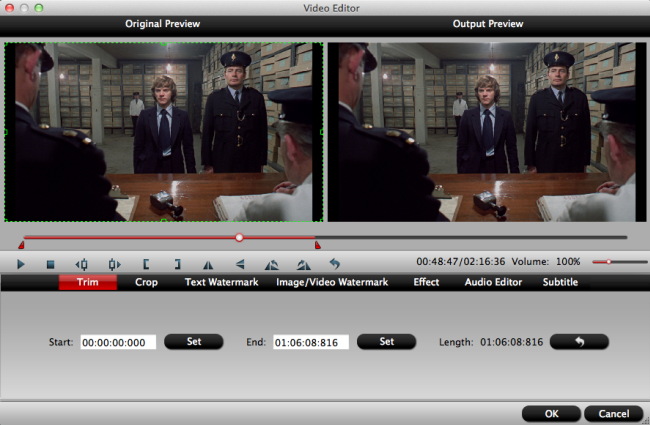 CropBecause the screen of your iPad mini 4 is small, so if the video have black area, then you can use this function to crop the black area to watch with a bigger image.SubtitleIn this tab, click browse button to add *.srt or *.ass/*.ssa online downloaded subtitle-files to the video as hard subtitles.Step 3: Customize output video and audio qualityOpen "Profile Settings" window to adjust the output video codec, size, bit rate, sample rate and audio codec, sample rate, bit rate and channels according to your own preference.Step 4: Start to convertCarry out the conversion process by tapping right-bottom "Convert" button. When the conversion is completed, find and locate the converted files by hitting the "Open" folder on the main interface, then you can easily play downloaded Christmas MKV movies on iPad Mini 4 in MP4 format.Just a few steps and you can enjoy downloaded Christmas MKV movies on iPad Mini 4. So try it now.Related Articles:
With a 4k (3840x2160p) display and lossless 7.1 channel and an eight-core Jaguar CPU, paired with a Radeon 7000-series GPU, PS4 is amazing for playing games and watching movies. But its BD/DVD disc drive sometimes could really drive you crazy and freak you out. Next is a question asked from the reddit.“I haven't always had this issue, and I'm not sure when it started so I can't say what firmware update screwed me. If I start up my PS4 and eject whatever disc is in there, and put in a DVD nothing happens. I don't get the DVD to select on the main screen. It just sits there. Then when I go to power options and hit restart, it takes a good 5 minutes to restart because whatever my PS4 was doing with the DVD it locked it up and it usually says my PS4 shut down incorrectly. Only after its fully restarted will I see the option to play the DVD. I don't have any issues with games though. Does anyone have any clues to fix this?” if you have the same problem or other problem about playing DVD on PS4, then this article can definitely solve your problem.Different solutions to solve all kinds of problems you may have:1.Unexpected game disc/DVD ejection and followed with no acceptation of the discs.Official Solution: First, hold down the power button until the system beeps twice. Then wait about 30 seconds until all system lights are off. Unplug the power cord for three minutes. If the issue isn't exterminated, visit Sony online Service Request page.Users' Solution: Take the rubber stopper under the eject button off.2.When playing game DVD, it shows "NO Disc Inserted" or "Unrecognized Disc"Official Solution: Delete the game app data and reinstall it. If failed, try PS4 safe mode options.Solution 1: Clean your disc with a microfiber cloth. The disc reader is really sensitive to scratches and fingerprints.Solution 2: If your disc is BF4, try another one. Some users report they just have problems only on BF4.Solution 3: Dissemble your disc drive. Visit YouTube to know the detailed steps.Classic Solution: Take the disc out and reboot your PS4.3. After putting the disc into DVD drive, it shows a black screenSolution: When you see the black screen, change the input on your TV off the current HDMI then change it back.( That works for some people for some reason.)4.Issue with ejecting PS4 discs - discs get stuck in the11 driveSolution: Try to eject the stuck disc manually.These simple ways can probably get your PS4 DVD playback issues solved. After you tried all possible solutions and still can not solve PS4 DVD problems. Well, you need to contact Sony with your problem or there is still an indirect but easy way - you can convert your DVD to PS4 supported formats, such as MP4, AVI, H.264, H.263, DivX, WMV, MPEG-4. In fact, the DVDs are usually hard to be ripped due to region code and disc encryption protection. While, a professional DVD ripper - Pavtube BDMagic can solve your issue.It can rip your DVD/Blu-ray to PSP, PS3,PS4 supported formats, and you can adjust video encoder, size, bitrate, frame rate, etc. in the “Settings” to get the converted videos with small size or with high quality according to your own requirement.(review)Free download and install: Other Download:- Pavtube old official address: http://www.pavtube.cn/blu-ray-ripper/- Cnet Download: http://download.cnet.com/Pavtube-BDMagic/3000-7970_4-75922877.html Steps to rip DVD to MP4Step 1. Load DVD disc Launch the program, click "File" > "Load from disc" button to load DVD disc into the program.Step 2: Choose PS4 suitable formatClick "Format" drop-down bar, scroll down the menu on the left, go to select PS4 supported formats such as "PSP/PS3" > "PS3 Video (1080P) MPEG-4(*.mp4)" or other accepted formats.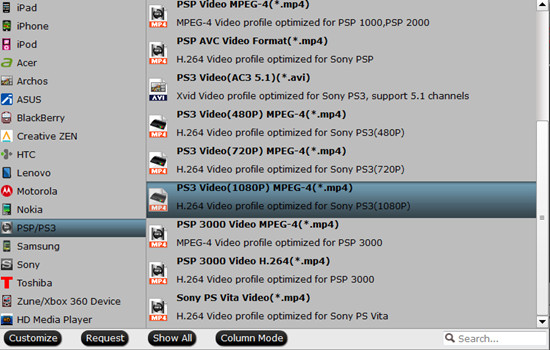 Tips:1. Click the Subtitle option and you choose the prefer language you want from the drop-down list. The PlayStation 4 (PS4) converter will hard burn the selected subtitle to PlayStation 4 (PS4) video, so that you can enjoy movies with hard-burned subtitles. Then click Audio to select the language like English, French to hear.2. Click “Settings” to change the video encoder, resolution, frame rate, etc. as you wish. Keep in mind that bitrate higher results in big file size, and lower visible quality loss, and vice versa.Step 3: Start to convertOn the right bottom, hit the big red “Convert” to start converting DVD to PS4. When the process is finished, you can locate your created movie by opening output folder.We hope this guide will help you with your issue.Mac user can use Pavtube BDMagic for Macto convert your DVD to PS4. And now, this program has updated to support the newest Mac OS X El Capitan. Moreover, now you can get the app at a big discount in Pavtube Christmas Coupon.Related Articles:
Have you prepared the Christmas gift for your family? Is your brother or father a cinephile? If so, why don’t present a Blu-ray/DVD/Video tool to help them liberate from tons of physical discs or make them more free in movie enjoyment? Pavtube offers up to 40% off discount for its Blu-ray/DVD/Video tools in Christmas Promotion activity to help those who have the plan. If your father has collected a shelf of Blu-ray/DVD discs and often complained that it took too much time to find the disc he wanted, a Blu-ray/DVD Ripper can be his favorite Christmas gift. With the software in hand, he can easily make a digital copy of Blu-ray/DVD disc then store them to NAS, USB External Drive, WD MyCloud or Seagate Wireless Plus for more convenience management. Pavtube provides three top-selling Blu-ray and DVD Rippers on Christmas. You can learn the detailed key features and discount at below:1. 40% OFF Pavtube DVDAid for Windows/MacOriginal price: $35Now: $21Read: How-toKey Features: Rip DVD discs protected by CSS, RC, RCE and region codes to H.265. M3U8, MP4, MOV, MKV, AVI, etc for all kinds of Portable Devices, TVs, Tablets, Projectors, etc with original video quality. More functions in Pavtube DVDAid Review 2. 30% OFF Pavtube BDMagic for Windows/MacOriginal price: $49Now: $34.3Read: How-toKey Features: Convert any commercial and region-locked Blu-ray/DVD to Samsung/Sony/Panasonic/LG TV, 4k Projectors, Tablets, Cloud Storage, Server, etc with suitable video/audio format. It allows you to choose desired subtitle/audio track or keep the forced subtitle in Blu-ray/DVD ripping process. Want to know other functions of Pavtube BDmagic? Click here. 3. 20% OFF Pavtube ByteCopy for Windows/Mac Original price: $42Now: $33.6Read: How-toKey Features: Extract nearly all formats video/audio from Blu-ray/DVD, especially multi-track MP4/MOV and lossless MKV with multiple subtitle/audio track and all chapter markers. Allows you to customize video/audio parameters in “Settings”. Learn reasons to choose Pavtube ByteCopyNote: The number of Blu-ray/DVD Ripper in the market that support to output multi-track video you can count on one hand. For certain cinephile, he may don’t have plenty of Blu-ray/DVD discs but he knows clearly from which torrent site he can download 1080p, even 4K movies. However, the downloaded movies probably can’t be played on iPad, Surface Pro, PS4, Android tablets, etc for format incompatibility issue or other reasons. In this case, a Video Converter with the capacity of working in any 4K/2K/SD/HD video can be treated as a ideal Christmas gift. Pavtube also offers the all-in-one media solution at the lowest price on Christmas. read the following details:20% OFF Pavtube Video Converter Ultimate for Windows/MacOriginal price: $65Now: $52Read: How-toKey Features: Deal with 4K//2K/SD/HD video in any format and Blu-ray/DVD to iPad, iMovie, FCP, Surface Pro 4, Kodi,PS4, Xbox One, etc with excellent video quality. Based on Windows, it can offer 6X times Blu-ray/DVD ripping speed with GPU acceleration by H.264 codec. Learn more in its review. If there is a movie fan in your family, a Blu-ray/DVD/Video converter must be a perfect Christmas gift. And with Pavtube Christmas Coupon, you can save a lot of money. So why still hesitate? Just action now! Tip: To help you make a smarter choice among Pavtube Blu-ray/DVD/Video tools, you can read the comparison article before you decide which one to buy:Pavtube Softwares Comparison: ByteCopy vs BDMagic vs DVDAid vs Video Converter UltimateMore Guides About Christmas:
What is ISO Image?ISO image, or called an ISO file, is the image of an entire CD or DVD, the whole contents of which can be completely duplicated and contained in a single ISO file. ISO image is an image file produced by copying all information in an optical disc. Therefore, ISO image is qualified to be the genuine digital copy of the original. It usually has a file extension of .iso and might contain a UDF (ISO/IEC 13346) file system.Why should upload ISO to Synology NAS in MP4 format?Although we can upload ISO to Synology NAS, the size of the ISO file is really huge, and the number of multimedia players that support to play ISO via Synology you can count on one hand. XBMC is the only media platform I know of which works with Synology on ISO through DLNA. MP4 format is wide compatible with various devices, like portable devices, TV and media servers etc. So I suggest you to upload ISO to Synology NAS in MP4 format.How to upload ISO to Synology NAS in MP4 format?There are many video converters in the market for you to choose, some can retain full quality of the original video with big size or others could greatly compress the file size with quality loss. So here Pavtube Video Converter Ultimate is highly recommended to help you upload ISO to Synology NAS in MP4 format. Because you can choose to keep HD video quality or compress the video size depend on your need. So follow the next steps to convert ISO to MP4.Hot search: DVD to iTunes, Blu-ray to USB hard driveFree download and install Other Download:- Pavtube old official address: http://www.pavtube.cn/blu-ray-video-converter-ultimate/- Cnet Download: http://download.cnet.com/Pavtube-Video-Converter-Ultimate/3000-2194_4-75938564.htmlSteps to upload ISO to Synology NAS in MP4 formatStep 1. Run the programLaunch the ripping software and click the "Load IFO/ISO" button to have the ISO content imported. You can also add DVD Blu-ray discs(with BD drive), VIDEO_TS folder for converting.Step 2: Set output format as MP4From "Format" drop-down option, choose output formats as "HD Video" > "H.264 HD Video(*.mp4)" if you want to enjoy a HD video quality.Tips: On the main interface, check the movie titles you want to rip, from the drop-down list of subtitles, select one of your desired language as your subtitles, if you check "Forced subtitles" option, you will see subtitles only when actors are speaking a language that are different from the subtitles that your specified before.Step 3: Customize output video qualityClick "Settings" on the main interface to pop out "Profile Settings" window, adjust the codec, size, bitrate to fit with your devices.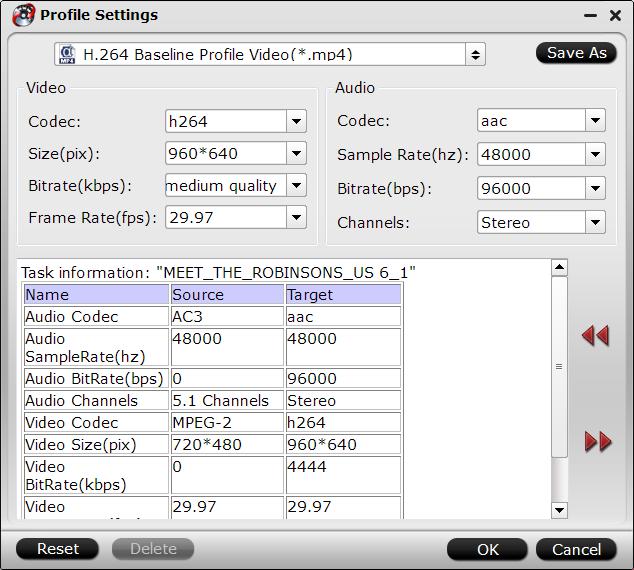 Step 4: Start to convertClicking the “Convert” button on main interface to convert ISO to MP4 format. When the conversion is completed, feel free to transfer ISO to Synology NAS in MP4 and play them on your multimedia players.Mac user can use Pavtube iMedia Converter for Mac to convert your ISO to Synology NAS in MP4 format. And now, this program has updated to support the newest Mac OS X El Capitan. Moreover, now you can get the app at a big discount in Pavtube Thanksgiving Coupon. Related Articles:
As a DVD collector, you can certainly watch your DVDs in the usual way, with a DVD player. But for Apple users, wouldn't it be bad to rip and backup your DVD collection to iTunes library, so that you can sync them to your Apple devices and watch them anywhere?All iOS devices like iPhone 6S, iPhone 6, iPad Air 2, iPad Mini 4, iPod Touch 6, Apple TV 4 are using iTunes to manage the digital video files. That is to say, if you want to watch movies on your Apple devices, you have to sync videos to your iTunes library firstly. However, what should be mentioned is iTunes library only recognize video files in MP4, MOV, M4V formats, and it can not rip DVD due to the copy protection. So if you want to enjoy DVD videos on Apple device, you have to firstly rip DVD to compatible formats for iTunes library. Some of you may have not figured out a proper way to rip and backup DVD collection to iTunes library, so this article will show you the right solution.The current software options for ripping a DVD are virtually endless. From free to costly, easy to complicated, the right ripping tool is completely subjective to the end-user. Here I will introduce you two DVD rippers.1. HandBrake: This free app lets you convert DVD to other mainstream formats, like MP4, MKV, which you can add to iTunes library. It has immense power for offering all sorts of options for ripping, managing audio tracks, displaying subtitles and more. You can also use it to convert videos from most formats to iTunes-compatible files. However, it can not rip blu-ray and commercial DVD.2. Pavtube BDMagic: If you are looking for ease of use, then don’t mind spending a little money to buy it. As it can convert DVD, 2D/3D Blu-ray and ISO image files to iTunes library compatible video formats for playing on Apple devices with easy operation. I’ve found the quality to be excellent, and see no difference when compared to playing the discs themselves. Now download it and follow the easy steps here to rip and backup DVD collection to iTunes library. (review) Free download and install: Other Download:- Pavtube old official address: http://www.pavtube.cn/blu-ray-ripper/- Cnet Download: http://download.cnet.com/Pavtube-BDMagic/3000-7970_4-75922877.htmlSteps to rip and backup DVD collection to iTunes libraryStep 1. Load DVD discsConnect the external DVD drive, place DVD disc in DVD drive. When the Welcome page pops up, Click "Try" to continue. In the Main interface, click "File" > "Load from disc" to load DVD movies. Here you can also import blu-ray, ISO files and IFO files to convert.Tips: You can choose preferred subtitle and audio by scrolling down the "Subtitles" and "Audio" option. And "Forced subtitles" will help you get translations only alien languages are displaying.Step 2: Set output formatClick the drop down box of "Format" to select iTunes highly compatible format like MP4 from "Common Video", HD MP4 from "HD Video".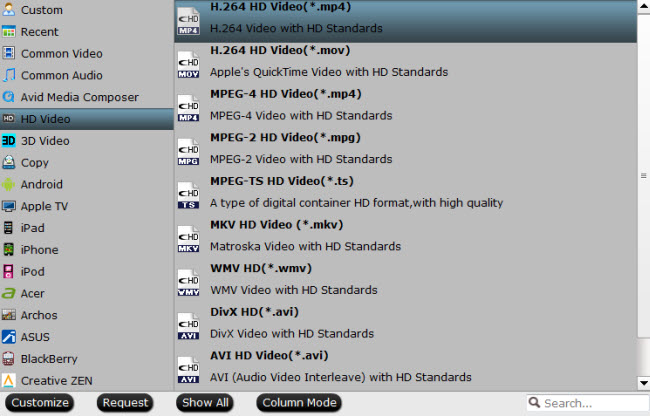 Tips: If you want to add the DVD movie to iTunes for play on iPhone, iPad, iPod, etc., you can also directly select iPhone, iPad, iPod as the output format to get videos with optimized settings for your Devices. What is more, you can go to "Settings" page to adjust parameters of your output profile including Video&Audio bit rate, frame rate, aspect ratio, etc.Step 3: Start to convertWhen you have done everything, click "Convert" button to rip DVD movies to iTunes formats. Once the conversion completes, you can get the ripped DVD movies file under "Open" panel. Now, it is much easy for you to load the local ripped DVD movies into iTunes library and sync the movies from iTunes library to your Apple devices.Mac version is here. Now, this program has upgraded to support Mac OS X El Capitan.Moreover, now you can get the app at a big discount in Pavtube Thanksgiving Coupon.Related Articles: