Copy Rented Angelina Jolie Movies on DVD and Blu-ray

The divorce news put Angelina Jolie in the spotlight hotspot again and make some people want to review her movies again. If you didn't collect Angelina Jolie movie before, renting Angelina Jolie movies on DVD and Blu-ray on Netflix is a nice idea. Below are Angelina Jolie's most popular movies. You can directly click the picture to online rent them on Netflix.


By the Sea


Mr. & Mrs. Smith


Maleficent


Unbroken


The Bone Collector


Salt


Girl, Interrupted


In the Land of Blood and Honey


The Tourist


Wanted


Changeling


Tomb Raider: The Cradle of Life


Beyond Borders


Alexander: Theatrical Cut


Taking Lives


Cyborg 2


George Wallace


Sky Captain and the World of Tomorrow


How to Make a Digital Copy of Netflix DVD for Storing and Collecting

We spend money but we don’t own the movie indeed. That’s a pity. Therefore, somebody just wonder if we can copy the rented Netflix Angelina Jolie DVD/Blu-ray and put it away. Sure, you do. You can remove the copy-protections on DVD with?Blu-ray/DVD Ripper?and store the rips to your hard disc, NAS, personal cloud storage, server, external hard drive and other storage devices. In this case, you can own the Angelina Jolie Netflix DVD/Blu-ray forever in the form of duplicates. Below lists the specific guide to instruct you how to rip and backup Angelina Jolie Netflix DVD/Blu-ray to storage devices.

To reach the above goal, a DVD Ripper is a necessity.?Pavtube BDMagic (review) is a top-ranked DVD Ripper in this field. Its key features are shown as below:
  • With decent decrypting capability of removing CSS Copy-protections and DVD region codes?including the latest Netflix DVD discs
  • Rip Netflix DVD to H.265, M3U8, MP4, AVI, WMV, MOV, MPEG, FLV, 3GP, FLAC, MP3 and other video/audio formats
  • Has optimized preset for iPhone, iPad, Apple TV, Android Phone/Tablet, Microsoft, TV, etc while converting Netflix DVD
  • Copy the entire disc in original file structure with all subtitle tracks and audio streams preserved.
  • Save 100% intact VOB main movie from your Netflix DVD Disc without any quality loss.
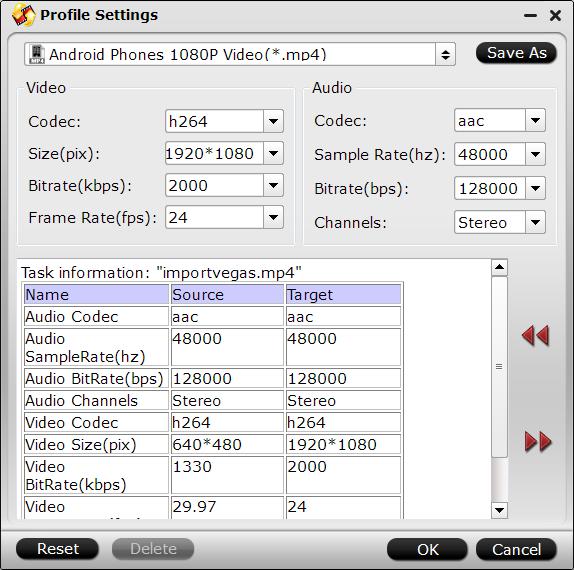
  • Allows you to decide the video/audio bitrate, frame rate, size, codec, sample rate, channel during DVD ripping process
Free download and install:

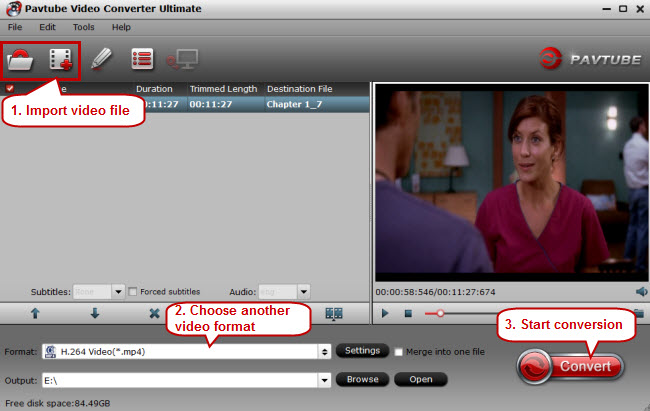
Step 1. Load Netflix Angelina Jolie DVD/Blu-ray movie

Click “File” > “Load from disc” to load Netflix Angelina Jolie DVD/Blu-ray movie.


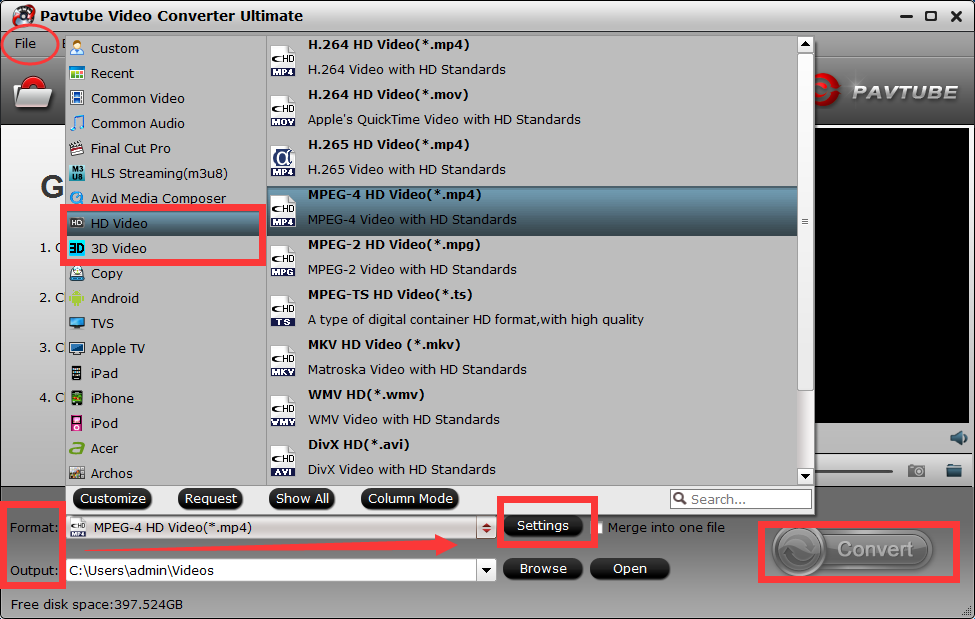
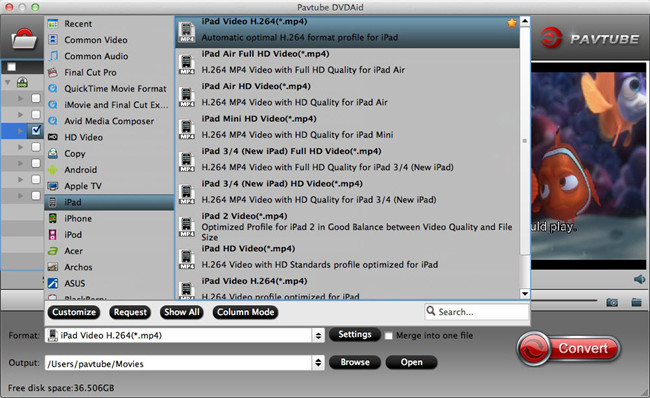
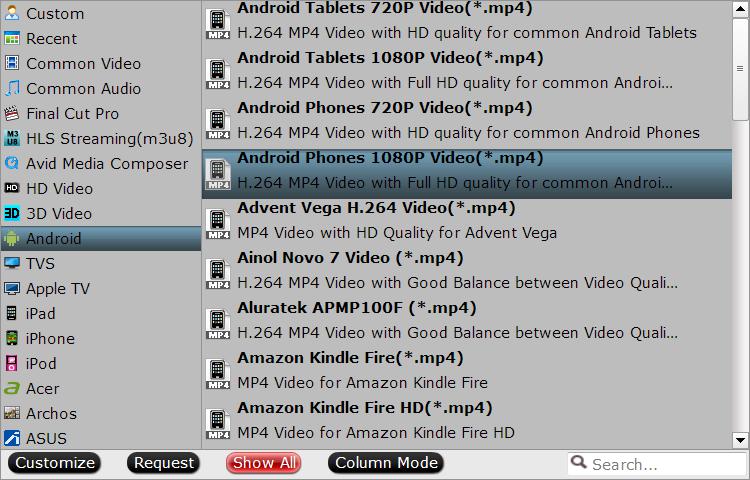
Step 2. Choose MP4 as output

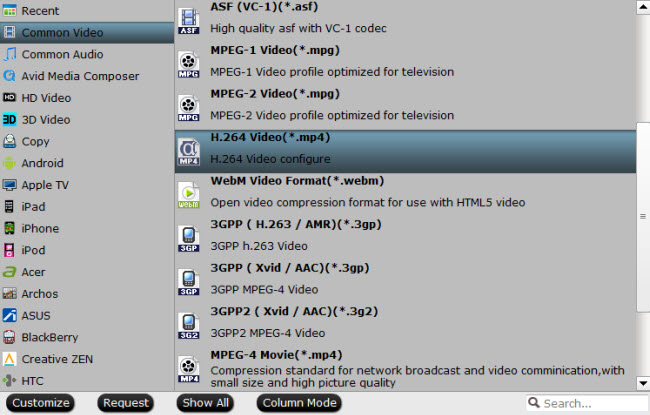
The playback devices like iPads, laptops, smart TVs, game consoles, Apple TV, smartphones and tablets support playback MP4 video files. So you can target MP4 as output from DVD movies. Click the format bar to follow “HD Video” > “H.264 HD Video (*.mp4).”


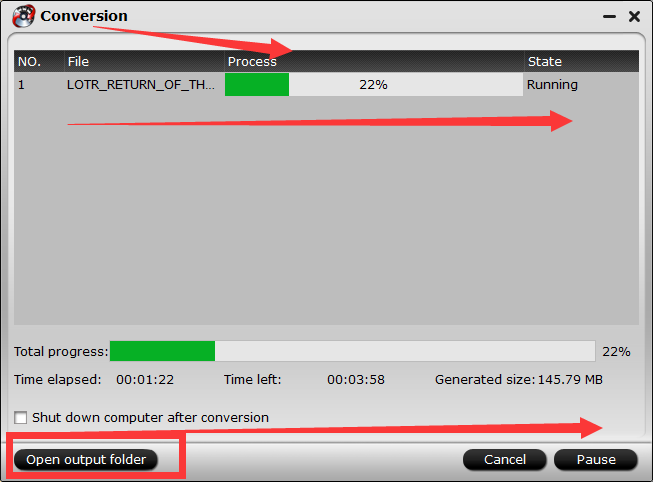
Tip 2. The unique ability that this DVD ripper has is that it can rip both DVD and Blu-ray sources with multiple audio and subtitle tracks, chapter markers preserved. For instance, you can rip?DVDs to multi-track MKV?for playback with the VLC player.Step 3. Rip Netflix Angelina Jolie DVD/Blu-ray to MP4

Hit the “Convert” button to start ripping Netflix Angelina Jolie DVD/Blu-ray movies to MP4 format for free.

Now, you can keep your Netflix Angelina Jolie DVD/Blu-ray movies forever. 

Related Articles: 

The Ways to play MKV Files to VLC media player

It anwswers the question "Does VLC play MKV?" and gives solutions to fix VLC play MKV error. 

- Does VLC media player support the .MKV format? If not, which players can I run on Linux? 
- I am seeking for a free video player to play my MKV files. How about VLC? Can it play MKV?

Does VLC play MKV? From VideoLAN official website, we learn that MKV is really one of VLC Player supported video formats. Actually, VLC can easily open MKV files but you may encounter the following problems, no sound and external subtitle not loaded error. In order to successfully play MKV videos, most of people prefer to make use of professional MKV players.  

Free download and install 
  
Solution 1: How to Make VLC Play MKV or HD MKV Well?

VLC Player No Sound Solution: Solution 1, Unmute your VLC Player; Solution 2, select Tools > Preferences menu to open Preferences dialog, selectAudio on the left, and confirm Enable audio is checked. Then Click Output module drop-down button and try a different default.

MKV or HD MKV Skipping Solution: Select Tools > Preferences menu to open Preferences dialog, then select All at the bottom of the dialog, and then select Input/Codecs on the left. On the right of the dialog, in Advanced group, set the value of File caching to 1000.

MKV or HD MKV Choppy Solution: Try to disable hardware decoding. Go to Tools > Preferences menu, selectInput/Codecs > Video codecs > FFmpeg. And then set the value of Hardware decoding to Disable in Decoding group.

A Universal Solution: Install appropriate codec pack. There are various free codec packs online which will allow us to decode and play MKV files. The disadvantage of this approach is that you have to download a lot of codecs but if you are only trying to play one type of video file. Another shortcoming is these codecs not always work well. 

If all above solutions are not fit you or can't solve your issue, in this case, we highly recommend an ultimate and commonly used method to solve "VLC not playing MKV files" - convert MKV to VLC Player more compatible formats with Pavtube MKV to VLC Converter. 

Solution 2: Convert MKV for Playing MKV with VLC via Plex on PC/Mac 

Pavtube Video Converter Ultimate is the utility for you. With it, you can fast convert MKV to AVI that can be easily played in VLC via Plex. Besides, this video convert app can allow you to convert any other popular video and audio format like MP4, MOV, AVI, WMV, FLV, 3GP, VOB, AC3, MP3... with ultra-fast speed and zero quality loss. If you are Mac users, please turn to the equivalent Mac version named Pavtube iMedia Converter for Mac to transcode .mkv files to VLC on Mac OS X (El Capitan included). 

Once you download and install the video converter program, follow the steps below:

Step 1. Click the "Add Files" or "Add From Folder" button to load MKV videos for converting. 


Step 2. As MP4 is a universally used video format, sure it can be supported by most devices (e.g. mobile devices, TVs, and streaming media players). Click the format bar to find “Common Video” > “H.264 Video (*.mp4).” 


Step 3.  Convert MKV files to MP4, on the main UI there is a big red button “Convert”, and click it to get down to converting VLC videos to MP4 format. No matter which method you’d like to prefer, you’ll get MP4 videos compatible with a plenty of devices. Then,stream converted videos to VLC via Plex. 
 

Convert HD/4K movies on your Samsung Galaxy A9

Handbrake doesn't let me put videos on my Galaxy A9 because it has no specific profile for this gadget, so is there any good Galaxy A9 video converter recommended to me? By the way, I want one that offers pretty decent quality, doesn't stick the logo on my videos and it converts all of the videos to Samsung Galaxy A9, not just half of it. Thanks a lot. - Yahoo Answer 
 

Solution: Owning to the popularity of Galaxy A9, Samsung Company has zoomed to the top global mobile phone provider. One of the reasons that make Samsung Galaxy A9 so fantastic is that it is the most wonderful phone for on-the-move video enjoyment. But the limited video formats supported make Samsung Galaxy A9 impossible to play all videos. In the case, you'd better search for a reliable Galaxy A9 video converter to get video converted to Samsung Galaxy readable formats. Prior to the video to Galaxy A9 conversion, let's have a look at this media player supported HD/4K audio/video format. 

As a standard-bearer in the field of video conversion, this Galaxy A9 video converter program provides you a more fantastic digital experience with your Samsung Galaxy A9 device since it supports converting WMV, FLV, MOV, AVI, MKV, MP4, M2TS, etc. videos also to Samsung Galaxy A9 playable format on Mac running system. The specialty of this best video converter for Galaxy A9 is the built-in profiles made for each type of Samsung gadgets, making it stand out among other similar software at present. 

What is Advantage of SAMSUNG GALAXY A9 (2016) Specifications? 

Network GSM 3G HSDPA with 4G LTE 
LCD 6 inches 
Processor Quad-core 1.8 GHz Cortex-A72 & quad-core 1.2 GHz Cortex-A53 
Memory Internal 32 GB 
4 GB RAM 
External memory using MicroSD maximum 128 GB 
Camera Quad-core 1.8 GHz Cortex-A72 & quad-core 1.2 GHz Cortex-A53 
Front Camera 8 MP 
Fingerprint Sensor 
NFC 
Operating System Android Marshmallow version 6.0.1 
Battery Li-Ion 5000 mAh 

Pavtube Video Converter Ultimate Deluxe not only can burn videos to DVD, but also can convert among various videos, such as converting AVI to HD/4K video to iPad 2, AVI to ipad 3, convert MPEG to iPad 3, FLV to iPad 2, MKV to iPhone, WMV to Zune, DVD video to Android phone and so on. 

Free download and install 
  

Other Download: 
- Pavtube old official address: http://www.pavtube.cn/blu-ray-video-converter-ultimate/ 
-http://download.foxreal.com/ 
- Cnet Download: http://download.cnet.com/Pavtube-Video-Converter-Ultimate/3000-2194_4-75938564.html 

How to Use this All-in-one 4K & HD Video Converter? 

Note: Please make sure that all the HD/4K video Converter are just for personal use. 

Step 1. Add movies resources 

Insert your movies into your computer drive. Launch Converter, then click on the “Load” button in the upper left of the program’s window, next select your DVD drive in the “For Folder” dialog box and click “OK”. The program will read and load media contents on the plastic disc in a few seconds. 

P.S. 

Besides discs, the program also can load and convert folders, ISO files, IFO files from hard drive for Samsung Galaxy A9. 
By clicking the dropdown list of “Subtitles”, you can select your preferred subtitles while viewing your DVD movie on Galaxy A9. 
If you want to merge titles into one large file, return to the main interface and select two or more titles you want to combine, then check the “Merge into One File” option at the bottom of the main interface. 
Click the “Setting” button to specify a destination folder. 


Step 2. Select output video format for Galaxy A9 

Click the “Profile” drop-down menu and select the output video format as .MP4(H.264/MPEG-4). Certainly you can also pick other video formats that Samsung Galaxy A9 smartphone supports like M4V, AVI, WMV, 3GP, 3G2, etc., you can go back to learn more Galaxy A9 supported formats. 

In addition, you can also directly choose preset video format for Galaxy A9 from “Samsung > Samsung Galaxy ″, the output videos could fit on your Galaxy A9 perfectly. 

Tip: You can also click “Settings” to change the video encoder, frame rate, resolution, etc. Remember the file size and video quality is based more on bitrate than resolution which means bitrate higher results in big file size, and lower visible quality loss. Go back to get the best settings. 

Step 3. Start the Video/movies to Galaxy A9 conversion 

When you have finished all the above settings, you can simply click the “Converter” button on the main interface and let the software do the HD/4K to Galaxy A9 conversion for you. After the conversion, click “Browse” to locate the converted movie files and then transfer them to your Galaxy A9 for watching anytime anywhere. 

The More Features About the Tool:
  • Unique Features of this HD/4K Converter:
  • Use Advanced De-interlaced Accelerator to achieve better image quality.
  • Use High Quality Engine to better output resolution.
  • Use Intelligent A/V Synchronizer to solve video and audio not synced trouble.
  • Multi-Core CPU and Hyper Threading Technology supported: up to 15x real time HD Video
  • Converting and DVD Burning speed. 

    Related Information 

    4K Video on Mac EI Capitan : Three excellent 4K Video Converter that will work on the Mac EI Capitan. You can choose from the best 4K video converter software for Mac to convert ultra high definition 4K videos. 

    4K Video DJI Phantom : The solution to Edit DJI Phantom 4 4k videos in Sony Vegas Pro in a smoothly way. 

    4K Video to Samsung 4K TV : To sit on the couch and shared happiness with family on the big screen. that is a wonderful thing. 

    4K Video to UHD Video : In this resolution, the audiences are able to see every detail, every close-up of the frames in 4K movies. 

    4K Video on PC or Mac : If you've got some 4K Ultra HD videos, this article will give you the best 4K Ultra HD Video Converter to Convert/Compress 4K Videos on PC or Mac in a simple way. 

    Source:http://bestvideosolution.blogspot.com/2016/08/hd-4k-movies-to-galaxy-a9.html

Backup DVD to Drobo 5n NAS on Mac OS X 10.11

As a DVD collection owner, you would you like to sharing your owned DVD to your friend and want to store them to your Drobo 5n NAS hard drive for more convenient playback. For thousand times you tried to to copy the DVD files to Drobo 5n NAS.


The Drobo 5n NAS is just a big file storage and you may find that just copying the DVD files to Drobo 5n NAS directly is a pain to try and play with a media streamer. The all-in-one solution (software wise) to take the DVDs and put the DVD movies on Drobo 5n NAS drive for playing on most media streamers is to hoose a DVD to Drobo 5n NAS powerful third-party software for backup To rip DVD movies for Drobo 5n NAS on Mac. There are many DVD ripping tools for Mac on the market. PavtubeByteCopy is highly recommended to you.

IIt is capable of ripping DVD to MP4, AVI, MKV for Drobo 5n NAS streaming with no quality loss in the fast speed, est of all, it allows you to copy your DVD/Blu-ray to NAS with original structure or main movie only for backup onto Drobo 5n NAS.And what I’ve learned is that MP4 would be one best target format for it is fully compatible with nearly all media devices including iPad, iPhone, PS3, Apple TV, etc. If you are running on WIndows, turn to Mac version. Just download it and follow the steps below to learn how to do it.

Free download and install:
 

Other Download:
- Pavtube old official address: http://www.pavtube.cn/dvd_ripper/
- Cnet Download: http://download.cnet.com/Pavtube-DVDAid/3000-7970_4-76158510.html

Step 1: Load DVD files

Run Pavtube ByteCopy for Mac, and load DVD files to it. You can click “DVD ROM” to load movie from DVD drive or “ISO/IFO” DVD ISO file.


Step 2: Select output format for Drobo 5n NAS
Click on the drop-down list at the opposite side of “Format”, and then choose “HD Video > MKV HD(*.mkv)” format. With this format, users can get best DVD entertainment on TV.


With this tool, you can also get Blu-ray, DVD for enjoying on Lenovo Tablets and Apple TV.


Tip: Pavtube ByteCopy for Mac let users control/customize output file quality. To improve video quality, simply click “Settings” and set video bitrate up.

Step 3: Start ripping DVD to MKV video.

Click “Convert” button to rip DVD to Drobo 5n/Plex media server, once the ripping task is finished, you can click “Open” button at the bottom of the main interface to get the output mkv file for storage on Drobo 5n and for enjoyment on TV via Mac Mini Plex media server.

After the conversion, click Open button to find the output files. Make sure the wireless network connection is accessible among the Drobo 5n NAS and Apple TV, PS3, HD TV or other media players. Then just enjoy the high quality DVD movies anywhere anytime.

For more movie entertainment, read this Pavtube Softwares Comparison review to get more multimedia tools.

Related Articles: 


As a DVD collection owner, you would you like to sharing your owned DVD to your friend and want to store them to your Drobo 5n NAS hard drive for more convenient playback. For thousand times you tried to to copy the DVD files to Drobo 5n NAS.


The Drobo 5n NAS is just a big file storage and you may find that just copying the DVD files to Drobo 5n NAS directly is a pain to try and play with a media streamer. The all-in-one solution (software wise) to take the DVDs and put the DVD movies on Drobo 5n NAS drive for playing on most media streamers is to hoose a DVD to Drobo 5n NAS powerful third-party software for backup To rip DVD movies for Drobo 5n NAS on Mac. There are many DVD ripping tools for Mac on the market. PavtubeByteCopy is highly recommended to you.

IIt is capable of ripping DVD to MP4, AVI, MKV for Drobo 5n NAS streaming with no quality loss in the fast speed, est of all, it allows you to copy your DVD/Blu-ray to NAS with original structure or main movie only for backup onto Drobo 5n NAS.And what I’ve learned is that MP4 would be one best target format for it is fully compatible with nearly all media devices including iPad, iPhone, PS3, Apple TV, etc. If you are running on WIndows, turn to Mac version. Just download it and follow the steps below to learn how to do it.

Free download and install:
 

Other Download:
- Pavtube old official address: http://www.pavtube.cn/dvd_ripper/
- Cnet Download: http://download.cnet.com/Pavtube-DVDAid/3000-7970_4-76158510.html

Step 1: Load DVD files

Run Pavtube ByteCopy for Mac, and load DVD files to it. You can click “DVD ROM” to load movie from DVD drive or “ISO/IFO” DVD ISO file.


Step 2: Select output format for Drobo 5n NAS
Click on the drop-down list at the opposite side of “Format”, and then choose “HD Video > MKV HD(*.mkv)” format. With this format, users can get best DVD entertainment on TV.


With this tool, you can also get Blu-ray, DVD for enjoying on Lenovo Tablets and Apple TV.


Tip: Pavtube ByteCopy for Mac let users control/customize output file quality. To improve video quality, simply click “Settings” and set video bitrate up.

Step 3: Start ripping DVD to MKV video.

Click “Convert” button to rip DVD to Drobo 5n/Plex media server, once the ripping task is finished, you can click “Open” button at the bottom of the main interface to get the output mkv file for storage on Drobo 5n and for enjoyment on TV via Mac Mini Plex media server.

After the conversion, click Open button to find the output files. Make sure the wireless network connection is accessible among the Drobo 5n NAS and Apple TV, PS3, HD TV or other media players. Then just enjoy the high quality DVD movies anywhere anytime.

For more movie entertainment, read this Pavtube Softwares Comparison review to get more multimedia tools.

Related Articles: 

Rip my DVDs to iTunes on Windows or Mac OS

Summary: Want to know how to import all Kinds of DVDs files from Mac/PC to your iTunes Library easily? This article provides the easy way. 
 
How to rip a DVD to digital video format on a Windows computer or on Mac OS X ? Have trouble in importing MP4, MOV, AVI, VOB, Tivo, DIVX, MPEG, FLV, MVI, MKV, 3GP, WTV and more video files in iTune for playing? and how to convert these DVD to iTunes video format for playback or sync to ios devices, Apple TV? The following article will show you the best and fastest way to rip DVD to video and convert DVD movies to iTunes format. 

In many ways, a person's DVD collection represents an extensive investment. Naturally, there's the amount of money spent to acquire it, but there's also the essentially collective nature of the medium. DVDs are not being constantly produced, and to lose a rare or difficult-to-find disc can be a severe inconvenience. Given the value placed on our collections and the inherent difficulty in replacing certain favorites, it's not surprising that many people have taken to using DVD copy software to back up their DVD collections. 

iTunes, on one hand, is a media player app to play audios and videos, and on the other hand, a media library to download and manage digital music and video files on PC that runs alternatively on OS X or Windows OS, as well as on iPhone, iPad and iPod touch. 

Add unsupported DVD video to iTunes Library 

Reason One : iTunes doesn't natively support AVI, VOB, Tivo, DIVX, MPEG, FLV, MVI, MKV, 3GP, WTV, etc as input formats. 

Reason Two: Though Apple announced to support MP4, MOV, M4V, we still encounter issue when adding them into iTunes Library since these formats are container formats which may contain codecs that are not compatible with iTunes. 

Reason Three: If the file is an unprotected WMA file and you have Windows Media Player Series 9 or later installed, iTunes makes a copy of the file and adds it to your iTunes library. The original WMA file remains unchanged. You can't add protected WMA files or protected WMV files to iTunes. 

How to Rip my DVDs to iTunes?

If you want to enjoy music or movie on your Apple devices like iPhone, iPod, iPad and Apple TV, the first thing you need to do is to sync videos and audios from your iTunes library to your devices. ITunes is a media player computer program, used for playing, downloading, and organizing digital music and video files on desktop or laptop computers. iTunes could only recognize video files in MP4, MOV, M4V, etc. which means if you want to copy DVD movies to iTunes Library, you should rip DVD to iTunes playable videos before you can sync DVDs to iTunes for playback. 

Why choose Pavtube DVDAid Mac to convert DVD to iTunes supported format? The answer is simple. DVDAid to iTunes converter provides good quality output regardless of the end device that you are going to use. It converts DVD to any format supported by iTunes in simple steps. Besides, you can crop the black bars, add special video effects, split or merge videos, etc. as you like with the built-in editor. Just get it and rip videos from DVD disc to iTunes supported videos for playback on device, etc. in just a few mouse clicks! 

To do this you’ll be using DVDAid software (Review). They make the best DVD ripping & copying software out there. It’s by far my favorite — very easy to use, fast, and high quality. The first thing you want to do is click the link at the below for a free trial download of this software. That link will start an instant download of this program. Download and install the application from the link above, and you’ll be able to try it out for free. If you like it you can register and buy for the full version right from the program itself. 


Other Download: 
- Pavtube old official address: http://www.pavtube.cn/dvd_ripper/ 
- Cnet Download: http://download.cnet.com/Pavtube-DVDAid/3000-7970_4-76158510.html 

Simple and Effective Way to Rip my DVDs to iTunes 

Step 1. Please insert your DVD disc to DVD drive, just click the “Load DVD” in the top menu “File”, or load DVD folder files by click “Load DVD Folder” , then you can import DVD into DVDChef software for converting. 


Step 2. Select iTunes friendly formats and output folder 

After you have successfully completed loading your DVD, select the output format and folder. The video formats available are M4V, MP4 or MOV. In this case, we shall select MP4 format from the common video choices only for description purposes. If you do not have a ready folder, you can choose an output path as the destination folder to save the converted movie. 


iTunes Supported Format: 

iTunes can support the following audio and video files, AIFF (AIFC, audio CD, MP3, System 7 Sound (SND), uLaw (AU), WAV, QDesign, QuickTime audio (audio only movies) AAC (Advanced Audio Coding) as well as MP4. When it comes to video, Apple has allowed iTunes to read only one video format, which includes MPEG-4 (.mp4, .m4v). Meaning you can only convert your DVD to MPEG-4 for you to play them on iTunes. 

Step 3. After all things done, you need to do is click the “Converter” button in the bottom right, and it will start copying the DVD movie to your computer. This might take some time. However, it is important to note that the conversion time depends on the size of the DVD movies. 


If the transfer is successful you can further transfer the DVD to your iPad Air, iPad Mini 4, iPad 3, iPhoen 7, iPhoen 6, iPhone 6 plus, iPhone 5S, Apple TV 3 and other portable devices and you can easily enjoy them everywhere you wish to. 

That, my friends, is how to put DVDs onto iTunes — the absolute best way to do it. Go ahead and give that a try. Enjoy having your favorite DVDs in iTunes and any Apple devices now! 

iTunes Supported Importing Format 

Want to add or play your video/audio files via iTunes but failed? Check out the supported file formats of iTunes at first. 

iTunes Supported Video Formats 


According to Apple, iTunes supports any video format that works with QuickTime and files purchased or downloaded from iTunes store. That means if your video files have a .mov, .m4v, or .mp4 file extension, generally you can play them in iTunes. However, there are also limitations on video codecs, sample rate, etc. So if your .mov, .m4v or .mp4 files are rejected by iTunes, that may be because of a codec problem. 

iTunes Supported Audio Formats 


iTunes supported audio formats include: MP3, AAC, AIFF, WAV, Audible .aa files and iTunes purchased M4A and M4P music files. iTunes can convert between MP3, WAV, AAC, AIFF, Apple Lossless. 

Add supported video to iTunes Library 

Requirement: iTunes (the latest version iTunes 12.3.3 is recommended); iTunes Store account; Internet access (if necessary) 

Note: Before importing or adding videos to iTunes, you need to check if the format of the video you want to add is supported by iTunes. Beyond that, you should also make sure the files can be played in QuickTime (not all .mp4 files will play in Quicktime, for example). 

Right-click on the video you want to check and select "Properties" (Windows) or "Get Info" (OS X). 
Look for the "Type of file" or "Kind" entry. If the file is an .mkv, .wmv, or .avi file, it will need to be converted. 
Test the file in QuickTime. If the file is a supported format, load it up in QuickTime to make sure it plays. If it doesn't play, you'll need to convert it. 
1.Rename any video files with multiple periods in the name. Oftentimes videos downloaded from torrents will have multiple periods in the name to denote who ripped and encoded the video. Remove any of these extra periods, as they can cause problems when trying to import into iTunes. Right-click on the file and select "Rename" to edit the name. 


2. Launch iTunes. Make sure that you are running the latest version. 

3. Import the video. Click the File menu (Windows) or iTunes menu (OS X) and select "Add File to Library" (Windows) or "Add to Library" (OS X). Browse for the converted video and select it. 

If you are using Windows and don't see the File menu, press the Alt key. 
You will not receive any error or confirmation when adding a video file. 

For Windows: 


For Mac: 


4.Click the "Movies" button. This is located in the row of buttons along the top of the iTunes window, and looks like a film strip. 


5.Click the "Home Videos" tab. Any movie you import will be added as a "Home Video". If you don't see the video that you just imported, it wasn't properly converted to an iTunes-compatible format. 


6. Move the video to your "Movies" or "TV Shows" library. It can be difficult to find the video you want if they're all sorted into the "Home Video" library. Moving them to the proper spot will make it easier to watch or sync the videos later. 

Right-click the video and select "Get Info". 
Click the "Options" tab in the window that appears. 
Click "Home Video" next to "media kind" to select the library that you want to move it to. 
Click OK to save the changes. You will now be able to find the video in the proper library. 


7.Sync your movies to your iOS device like iPad, iPhone, iPod, Apple TV, etc. Now that the files are in iTunes, you can sync them to your iOS device. Click here for details on syncing. 

If the video does not sync to your device, you'll need to create a version in iTunes that your device supports. Click File and select "Create New Version". Select the device that you are syncing the video to, and then wait for the conversion to complete. 

By default, adding items to your iTunes library places a pointer to each file in the iTunes folder; the original file remains in the current location. For information about copying files to the iTunes folder instead of creating pointers to them. 

Related articles 

Rip Backup Blu-ray Movies to Samsung Galaxy A9 pro

Summary: When you have Blu-ray movies and want to view them on Samsung Galaxy A9 Pro, you need to rip Blu-rays to MP4 for Samsung Galaxy A9 Pro. 

Samsung company released its new smartphone - Samsung Galaxy A9 Pro in May 2016. From the users opinions and review, this international version gives customers excellent experience. Samsung Galaxy A9 Pro applied Android OS 6.0.1 and has a 6.0 inches display, 1080x1920 pixel, 32GB storage with a microSD card slot. So even if you plan to put many Blu-ray rips on this Galaxy A9 Pro to watch on the move, it still can satisfy you.

People, especially the youth, usually make their smartphone be a portable media player, not just a tool to connect others. They may download many movie, TV shows, music to kill time when they are free. But not every movie can be found in torrent site. Sometime, the blockbusters are only on Blu-ray discs, or Blu-ray discs. So when you have Blu-ray movies and want to view them on Samsung Galaxy A9 Pro, you need to rip the Blu-rays to Samsung Galaxy A9 Pro supported MP4, AVI, etc digital format with Blu-ray Ripper.

Speaking of Blu-ray Ripper, most of you are likely familiar with the excellent MakeMKV for ripping Blu-rays, but it only can rip Blu-ray to MKV, which is not supported by Galaxy A9 Pro, so you’ll need to get an alternative Blu-ray ripping tool. Here , you need a Galaxy A9 Pro Blu-ray Ripper to rip Blu-ray to Galaxy A9 Pro best playback formats. Pavtube ByteCopy for Windows will be the best choice, it can help you convert Blu-ray to a format that Galaxy A9 Pro supports with the original video quality and audio effect. At the same time, Blu-ray to Galaxy A9 Pro Converter not only can rip and convert Blu-ray to any formats, but also can help you convert DVD to other HD formats for your Samsung Galaxy S7, GalaxyS7 active, Galaxy J3 Pro, Galaxy C7, Galaxy C5, Galaxy J7, Galaxy J5 and Galaxy Tab Note Pro, Galaxy Tab A 10.1, Galaxy TabPro, Galaxy Tab S3, including MKV, AVI, MTS, WMV, etc. Read the review.

Note: If you are on Mac, turn to Pavtube ByteCopy for Mac for ripping Blu-ray to Galaxy A9 Pro on Mac (El Capitan included).

How to Rip Blu-ray to Galaxy A9 Pro with High Quality

Now, download Pavtube ByteCopy here.

Step 1: Load Blu-ray files 

Insert Blu-ray disc into Blu-ray drive. Install and run this best Galaxy A9 Pro Blu-ray Converter on your computer. Click “Load Disc” to load your files. You can just simply to drag and drop your backed up files into this program.


Step 2: Select format for Galaxy A9 Pro 


Pavtube ByteCopy offers many optimized video format for different devices. Just click “Format” bar to find “Android” profile. Here, you can choose “Android Phones 1080p video(*.mp4)” format.


Note: According to Samsung Galaxy A9 Pro specification, Galaxy A9 Pro supports MPEG4, H.263, H.264, DivX, XviD and WMV videos. 

Step 3: Customize output settings 

Besides, click “Settings” button on the interface, you will be able to check and adjust the video and audio parameters like bitrate, size, channels, etc. Just do it when you need.


Step 4: Start Converting Blu-ray to Galaxy A9 Pro 

Click “Convert” button to start Blu-ray to Galaxy A9 Pro conversion. Blu-ray to Galaxy A9 Pro Converter, which allows you to convert Blu-ray up to 6X faster than other converters with GPU Acceleration on the market.

Step 5: Transfer Blu-ray to Galaxy A9 Pro 


After Blu-ray to Galaxy A9 Pro conversion, click “Open Folder” button to locate the converted video files. You can transfer Blu-ray movies to Galaxy A9 Pro via USB cable after connect Galaxy A9 Pro to your computer.

Now, you can view your favorite Blu-ray movies on Galaxy A9 Pro anytime and anywhere. There are many Hollywood Blockbusters in Blu-ray that deserves to watch again and again, you can consider to rip these Blu-rays to Galaxy A9 Pro for playing like the popular The Walk,ZootopiaCaptain America: Civil WarThe Angry BirdsThe Martian, etc.

Additional Tips:

If you are looking for a powerful integrated tool to convert MKV, M2TS, VOB, FLV, AVI, H.265, etc to your Samsung Galaxy A9 Pro, Galaxy TabPro , Galaxy Tab 3, Asus Transformer Prime, Transformer Pad Infinity TF700, Google Nexus 6P, Google Nexus 10/7, Kindle Fire HDX, Galaxy S7/Edge, Nook HD, etc at the same saving time and effort, the all-in-one Pavtube Video Converter Ultimate program will be a nice choice for you. If you are running a Mac OS X computer, iMedia Converter for Mac is the alternative. And for save money, here is a software bundle promotion for you:

ByteCopy($42) + Video Converter Ultimate($65) = Only $79.9, Save $27.1

Related Articles: