Want to get a (HD/4K) Video Converter with only $9.9? Want to get a Blu-ray/DVD tool with up to 50% coupons? Pavtube Facebook Christmas Lowest Promotion is providing an absolute surprise for you! Here you can find out the best deals.
 The discount offering is to show gratitude to valued customers and potential users of Pavtube software, so we Roll out Christmas Sales with 50% ~ 55% Discount for top-selling Blu-ray/DVD rippers, Video Editor and Only $9.9 Video converters as well as $9.9 DVD Creator for Windows/Mac users, which can help you move favorite Blu-ray/DVD movies or convert digital videos to any home devices and edit & burn videos to DVD for home use! Pavtube products can also assist you to creat special timeless memories for this year's Christmas.50% ~ 55% Discount for top-selling Blu-ray/DVD rippers, Video Editor:Top 1. 55% OFF Media Magician for Windows/Mac


 Learn more about the softwareTop 2. 50% OFF Video Converter Ultimate for Windows/Mac Learn more about the softwareTop 3. 50% OFF ByteCopy for Windows/Mac Learn more about the softwareTop 4. 50% OFF BDMagic for Windows/Mac Learn more about the softwareTop 5. 50% OFF DVDAid for Windows/Mac Learn more about the softwareOnly $9.9 Video converters and $9.9 DVD Creator - Up to 78% Coupons:Top 1. $ 9.9 Video Converter for Windows/Mac Learn more about the softwareTop 2. $ 9.9 HD Video Converter for Windows/Mac Learn more about the softwareTop 3. $ 9.9 DVD Creator for Windows/Mac Learn more about the softwareTop 4. $ 9.9 MXF Converter for Windows/Mac Learn more about the softwareTop 5. $ 9.9 MTS/M2TS Converter for Windows/Mac Learn more about the softwareTop 6. $ 9.9 MXF MultiMixer / iMixMXF Learn more about the softwareTop 7. $ 9.9 MKV Converter for Windows/Mac Learn more about the softwareTop 8. $ 9.9 FLV/F4V Converter for Windows/Mac Learn more about the software What can Pavtube do?1) 1:1 Backup Blu-ray/DVD without region code or protection limit in two clicks.2) Rip Blu-ray/DVD into H.265/HEVC, M3U8, MP4, Apple ProRes, DNxHD, MOV, M4V, MOV, MKV, AVI, Xvid, Divx, VOB, MPEG-2, SWF, FLV... for playback on smartphone, tablet, TV set, HD media player, streaming server, Hard drive, Game console, or edit in Final Cut Pro, iMovie, Adobe Premiere Pro, Avid Media Composer, etc.3) Edit and Convert Canon/Sony/Panasonic/GoPro/Samsung/Nikon/JVC/Blackmagic/Red One shooted H.265, XAVC, XAVC S/L, MXF, MOV, AVCHD, AVI, MP4, VOB footages into common video formats, so you can watch or edit them on PC/Mac.4) Help you Burn DVD folder/ISO image/various video formats to DVD on Windows/Mac. More Christmas Topiscs1. Watch Christmas Movies on iPad Pro: A comprehensive solution are offered for you to transfer and watch Blu-ray/DVD/Online downloaded Christmas movies on iPad Pro.Youtube Video: https://www.youtube.com/watch?v=32X56tzKVQU2. Watch Christmas Decoration Video: A comprehensive solution to transfer and play Christmas decoration video on computer, mobile devices, game consoles or TV, etc.Youtube Video: https://www.youtube.com/watch?v=zekTsVJEJTI3. Upload Christmas Video on YouTube: It is likely that you will record all the funny moments happened on Christmas with your HD camera, smartphone or tablet. If you want to upload and share your Christmas video to YouTube, Facebook or Vimeo, here is a solution.4. Burn Christmas Video to DVD: Whether the Christmas videos are shot or downloaded, the fact remains that you have to use a high quality player preferably a DVD player so you comfortably sit and watch your awesome Christmas videos with your loved ones. For quality viewing, you have to burn Christmas videos to DVD.5. Stream Christmas Movies on Apple TV 4: For Apple users who have just got a new Apple TV, have you ever imaged of streaming your favorite Christmas movies to Apple TV for watching via large screen HD TV?Youtube Video: https://www.youtube.com/watch?v=9tjnWHEB9sI6. Edit Christmas Video with FCP: When the shooting stage is over, you can do some professional post production work of your Christmas video footage with FCP or FCP X before sharing them with others. However, you may face the challenge to import and edit Christmas video due to the format incompatible issues, this article will show you how to solve.Youtube Video: https://www.youtube.com/watch?v=t5puE0yQeXg7. Backup BD/DVD Christmas Movie Collection: If you happen have a lot Christmas movies either classic or newly purchased ones on Blu-ray/DVD disc, it is very essential for you to make a copy or backup of them before your precious Christmas movie collection get scratched, lost, stolen, or otherwise useless.Youtube Video: https://www.youtube.com/watch?v=7esfbre816g......Thanks for reading about this Pavtube Facebook Christmas promotion idea, we have lots more great articles andvideos, check them out!Expire on Jan 31, 2016.
Vimeo, a popular video sharing sites, gives users around the world a good place to upload, store, and share their videos over the worldwide web. The site supports many video formats for users to share their videos with their family and friends, like MP4, WMV, AVI, FLV, MOV, etc. While, it does not accept DVD videos. So, if you have some fantastic DVD videos and just want to share them on Vimeo, what should you do? Well, don’t be worried, as long as you rip your DVD to Vimeo friendly formats, such as MP4, it would no longer be a problem to upload DVD to Vimeo. Pavtube DVD Ripper is an excellent DVD ripping tool. It can help you convert DVD/Blu-ray videos to Vimeo supported video formats with fast speed and easy operation. To make it faster for you to upload videos to Vimeo, you are allowed to lower video parameters to lower converted video size. Moreover, it allows you to trim and crop your DVD videos to get the specific DVD video on your own need.(Read review)PS. With Pavtube DVDAid, you also could rip DVD to M3U8 for iTunes, and convert DVD to H.265 MP4 for Youtube and Facebook.Free download and install: Other Download:- Pavtube old official address: http://www.pavtube.cn/dvd_ripper/- Cnet Download: http://download.cnet.com/Pavtube-DVDAid/3000-7970_4-76158510.html Steps to Rip DVD to Vimeo Easily and FastStep 1. Load DVD discInsert your DVD disc into your computer DVD drive, then launch the program, from "File" menu drop-down list, select "Load from disc" to import source DVD disc movies to the program.
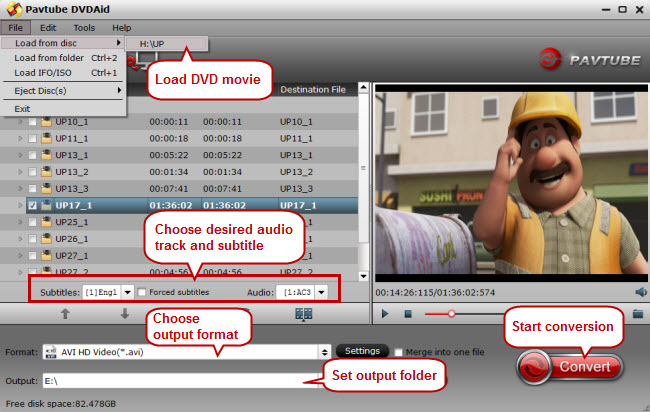 Step 2: Set output formatThough Vimeo supports most of the major codecs, but H.264 is perfect for uploading and processing. So click the format bar to follow “HD Video” > “H.264 HD Video (*.mp4).”
  Tip 1: Vimeo only allows basic users to upload video within 500MB per week and VIP users 5GB a week. This program helps you easily upload DVD video to Vimeo without worry about space limitation. For example, you can lower video codec, bitrate, size etc to lower converted video size.
 Tip 2: You can also crop and trim the video to get a specific part on your own need.
 Step 3: Start to convertHit the red button “Convert” to start converting DVD to Vimeo playable video process. After conversion, you can find your ripped video in output folder.In this way, you can upload your special DVD video onto Vimeo to share with your family and friends easily and fast.Related Articles:
Every year my family and I always have at least one big long road trip by car to visit my mom's family. Although it is a long trip, I like it because I get a chance to watch all sorts of videos on my Galaxy Note 10.1 tablet. It makes the long hours in the car a lot more fun. This year, I want to transfer some TiVo recordings to my Galaxy Note 10.1, while I really do not know how to convert TiVo recordings to play on my Samsung Galaxy Note 10.1 2014 Edition for watching on the long road trip.
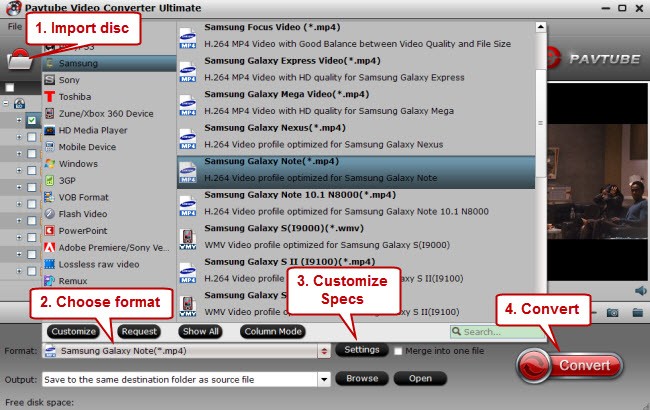
 Galaxy Note 10.1 only supports MP4, AVI, MKV, 3GP, WMV and FLV video formats, so in order to play TiVo recordings on it, you have to convert TiVo to Galaxy Note 10.1 friendly video format, like MP4. A powerful video converter can help you achieve the job easily. Here, Pavtube Video Converter Ultimate is highly recommended to you. Because, comparing with other free tools, it converts TiVo to MP4, AVI, WMV, MKV, H.265/HEVC etc. faster and comes with more optimized presets for all Android mainstream devices. Just proceed as follows:
Learn more: How to Transfer Tivo Recording to PC
Free download and install
Other Download:
- Pavtube old official address: http://www.pavtube.cn/blu-ray-video-converter-ultimate/
- Cnet Download: http://download.cnet.com/Pavtube-Video-Converter-Ultimate/3000-2194_4-75938564.html
Steps to convert TiVo to MP4 for playing on Galaxy Note 10.1
Step 1. Load TiVo recordings
On your PC, launch Video Converter and press “Option” button. Switch to “TiVo” tab in Option window, and enter TiVo Media Access Key. Then, drag and drop TiVo shows to the main interface for converting.
Galaxy Note 10.1 only supports MP4, AVI, MKV, 3GP, WMV and FLV video formats, so in order to play TiVo recordings on it, you have to convert TiVo to Galaxy Note 10.1 friendly video format, like MP4. A powerful video converter can help you achieve the job easily. Here, Pavtube Video Converter Ultimate is highly recommended to you. Because, comparing with other free tools, it converts TiVo to MP4, AVI, WMV, MKV, H.265/HEVC etc. faster and comes with more optimized presets for all Android mainstream devices. Just proceed as follows:
Learn more: How to Transfer Tivo Recording to PC
Free download and install
Other Download:
- Pavtube old official address: http://www.pavtube.cn/blu-ray-video-converter-ultimate/
- Cnet Download: http://download.cnet.com/Pavtube-Video-Converter-Ultimate/3000-2194_4-75938564.html
Steps to convert TiVo to MP4 for playing on Galaxy Note 10.1
Step 1. Load TiVo recordings
On your PC, launch Video Converter and press “Option” button. Switch to “TiVo” tab in Option window, and enter TiVo Media Access Key. Then, drag and drop TiVo shows to the main interface for converting.
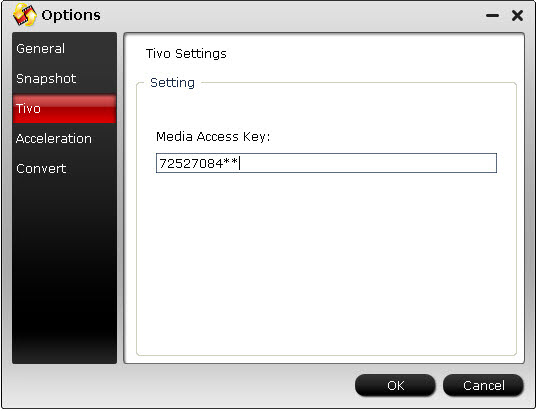 Note: Go to “TiVo Central" menu >> "Messages and Set Up" "Account and System Information” to find your Media Access Key on TiVo.
Step 2: Set output format
Click on the “Format” bar to select “Samsung” > “Samsung Galaxy Note(*.mp4)” as Galaxy Note 10.1 best output format.
Note: Go to “TiVo Central" menu >> "Messages and Set Up" "Account and System Information” to find your Media Access Key on TiVo.
Step 2: Set output format
Click on the “Format” bar to select “Samsung” > “Samsung Galaxy Note(*.mp4)” as Galaxy Note 10.1 best output format.
 Step 3: Customize output video and audio quality
You can adjust the video and audio parameters by clicking "Settings". The recommended video and audio settings are listed as below:
Step 3: Customize output video and audio quality
You can adjust the video and audio parameters by clicking "Settings". The recommended video and audio settings are listed as below:
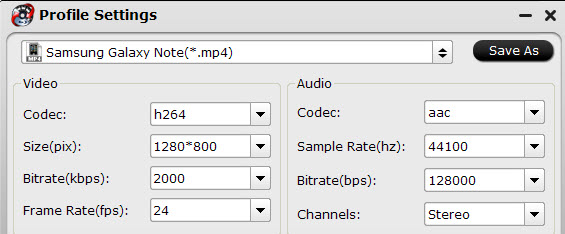 Tips: In order to store more videos into your Galaxy Note 10.1, you can lower the Codec, Size, Bitrate etc. on your own need to lower the converted videos size.
Step 4: Start to convert
Click "Convert" button to start TiVo to Galaxy Note 10.1 conversion. Once finished, you can get the output files via clicking on "Open" button effortlessly.
Now, you can freely transfer the converted videos to Galaxy Note 10.1 and enjoy your TiVo recordings on your long road trip.
PS. Mac user can downloaded the app from Pavtube iMedia Converter for Mac.
Related Articles:
Tips: In order to store more videos into your Galaxy Note 10.1, you can lower the Codec, Size, Bitrate etc. on your own need to lower the converted videos size.
Step 4: Start to convert
Click "Convert" button to start TiVo to Galaxy Note 10.1 conversion. Once finished, you can get the output files via clicking on "Open" button effortlessly.
Now, you can freely transfer the converted videos to Galaxy Note 10.1 and enjoy your TiVo recordings on your long road trip.
PS. Mac user can downloaded the app from Pavtube iMedia Converter for Mac.
Related Articles:
Amazon offers hundreds of TV shows, movies, Anime etc, and more and more people are willing to purchase and download Amazon instant videos from Amazon. While, if you are a Windows user and want to play Amazon instant videos on your Surface Pro 3/Pro 4 Tablet, you will find it is hard to play them on Surface Pro. Because Amazon instant videos are usuallyDRM protected(just like iTunes), which is not compatible for Windows devices. So, in order to play Amazon instant videos on Surface Pro 3/Pro 4 Tablet or other Windows devices, you must remove DRM protection and convert Amazon instant videos(usually the WMV video format) to Surface Pro 3/Pro 4 Tablet supported formats, like H.264 MP4 (H.264 MP4 format is compatible for almost all devices, such as Windows Devices, iOS devices, Android devices etc). Pavtube ChewTune is strongly recommended to you. It has wide import support for many DRM source files including not only Amazon store, but also Blu-ray/DVD Digital copies, iTunes store, Zune Marketplace, Nokia Music Store, etc. Moreover, it allows you to set output profile parameters, including codec, size, bitrate, frame rate, sample rate, channels, etc for better display quality.(review)Free download and install:
 Other download:Pavtube Old Site Download: http://pavtube-chewtune.software.informer.com/ Steps to convert Amazon videos to H.264 MP4Step 1. Load Amazon instant videosRun this DRM removal software in your PC, drag and drop the source Amazon movies from computer to it. Or hit the "Add Video" or "Add from folder" button to import your Amazon DRM movies.
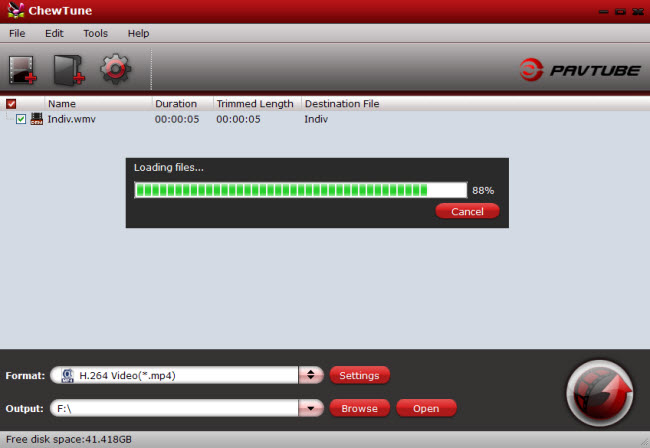 Step 2: Set output formatThe software offers optimized preset format for Surface Pro tablets, so you can turn to the output format list by clicking the format bar, and follow "Windows" > "Microsoft Surface Windows RT/Pro H.264 Video (*.mp4)."
  Note: For users who cannot find the exact same profile under Format list, just select “H.264 Video(*.mp4)” in “Common Video” category, and adjust parameters such as video bitrate, frame rate, audio sample rate, audio channels, and more in the “Settings” to get a satisfying video/audio playback on your device.Step 3: Start to convertClick the start “conversion” icon which is in round shape located in bottom right screen to start removing DRM protection from Amazon movies or TV shows and converting them to Surface Pro3/4 playable H.264 MP4 format.After the conversion, you can freely enjoy the Amazon install videos on your Surface Pro Tablet or any other portable devices, like Surface RT, Google pixel C, Galaxy Note 5 etc.Related Articles:
Even though there are many websites for you to download movies, you may still want to buy some DVDs to enjoy a high-quality video playback. While, you probably get tired of watching DVDs via DVD player or spending time looking for the DVD you want. If so, you can rip DVDs to your hard drive for watching freely on PC.However, it is hard for you to rip DVD to hard drive because of the DVD copy protection and region code. So in order to rip DVD to hard drive, you gonna need a DVD ripper to help you remove DVD protection and region code, and convert DVD to mp4 format, so that you can enjoy the converted movies on any media player on your PC. Here I highly recommend Pavtube DVDAid for you.(For Mac user, turn to Pavtube DVDAid for Mac for downloading. Now, the app has updated to support the El Capitan.) It can convert all kind s of DVDs to h.264 MP4 formats, which is compatible for all kinds of media player. And you can adjust the video parameters for a better video quality on your own need. Follow the next steps to finish the conversionFree download and install: Other Download:- Pavtube old official address: http://www.pavtube.cn/dvd_ripper/- Cnet Download: http://download.cnet.com/Pavtube-DVDAid/3000-7970_4-76158510.html Steps to rip DVD to H.264 MP4Step 1. Load DVD discRun the program, insert DVD into your computer's DVD optical drive, and from the "File" drop-down menu, select "Load from disc" to add DVD disc to the program.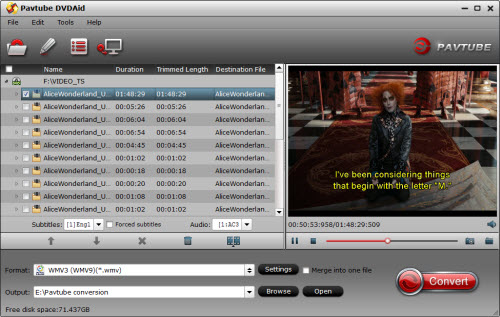 Step 2: Set output formatYou can choose "HD Video" > "H.264 HD Video (*.mp4)” from the “Format” bar or other HD video depending on yourself.
 Step 3: Customize output video qualityClick "Settings" to pop out "Profile Settings" window, set output video codec, size, bitrate, frame rate according to your own needs. For example, to enjoy high definition movies, you can adjust the output file resolution as "1920*1080" in "Profile Settings" > "Size(pix)".
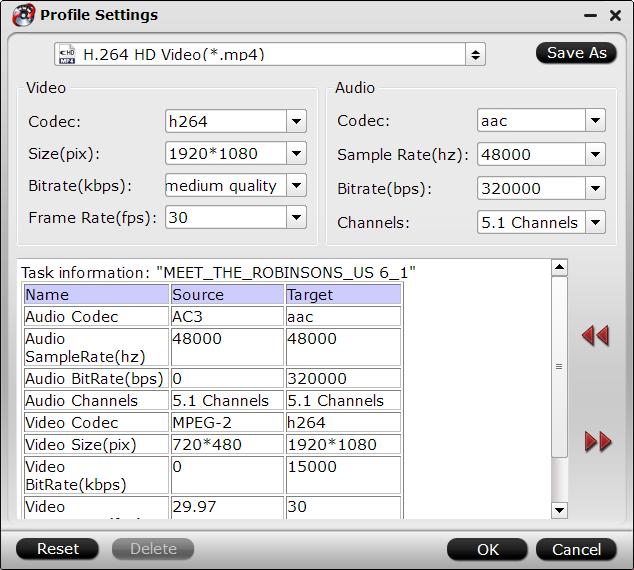 Step 4: Start to convertGo back to the main interface, press right-bottom "Convert" button to rip DVD to hard drive in MP4 format.After the conversion, you can enjoy your DVD movies on PC freely, or you can transfer the converted MP4 video to your smart-phone for watching on the go.PS. For Windows user, you can use Windows Media Player to play your converted DVD movies. For Mac user, you can use QuickTime to play the movies. For carrying around convenient, you can transfer the converted movies to External hard drive or Thumb drive, so that you can transfer your DVD movies to projector, TV, PC and etc via USB port.Related Articles:
Basically, my family and I go traveling once a month in a recreational vehicle, while my children have nothing better to do than watch movies on PC/Car TV when I am driving. I've got hundreds of Blu-rays but I got tired of lugging them around, so I bought a 2TB External HDD and just want to watch movies on PC/Car TV via that. However, I am not a computer-man and I really do not know how to backup Blu-ray to External HDD for watching in recreational vehicle.In order to backup Blu-ray to External HDD, you will need a Blu-ray ripper to rip the Blu-ray copy protection in advance and convert Blu-ray movies to External HDD compatible format, like MP4. There are many Blu-ray ripping programs on the web, while Pavtube BDMagic is the simplest, working method you could find. As it can not only rip Blu-ray movies, but also can copy DVD videos. Besides, it allows you to rip Blu-ray/DVD to various video formats, likeH.265/HEVC, H.264, MKV, MP4 etc for playing on not only PC/Car TV, but also other portable devices, such as Android phones, iPhone, PS4 etc. Moreover, you can set the video codec, size, bitrate etc to achieve better movie enjoyment. Here is the guide:Free download and install: Other Download:- Pavtube old official address: http://www.pavtube.cn/blu-ray-ripper/- Cnet Download: http://download.cnet.com/Pavtube-BDMagic/3000-7970_4-75922877.htmlSteps to rip Blu-ray to MP4Step 1. Load Blu-ray moviesClick “file” to find the “ load from disc” choice to import your Blu-ray movie. 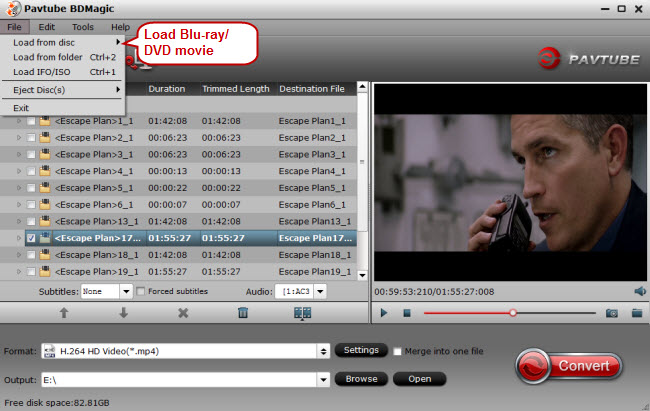 Step 2: Set output formatClick the format bar to follow “HD Video” > “H.264 HD Video (*.mp4)” supported by general media players as output format. If your device supports H.265, you can choose H.265 to lower the video size.
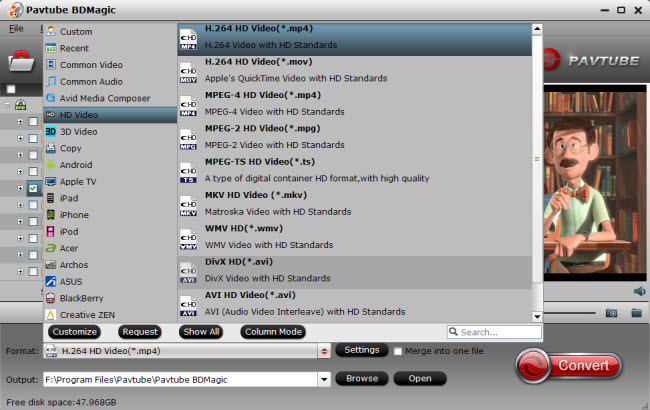 Step 3: Customize output video and audio qualityHere, you are free to adjust video and audio parameters in “Profile Settings” in order to achieve better movie enjoyment. You could set video size to 1080p and audio channel to 5.1 Channel to get excellent Blu-ray backup to External HDD.
 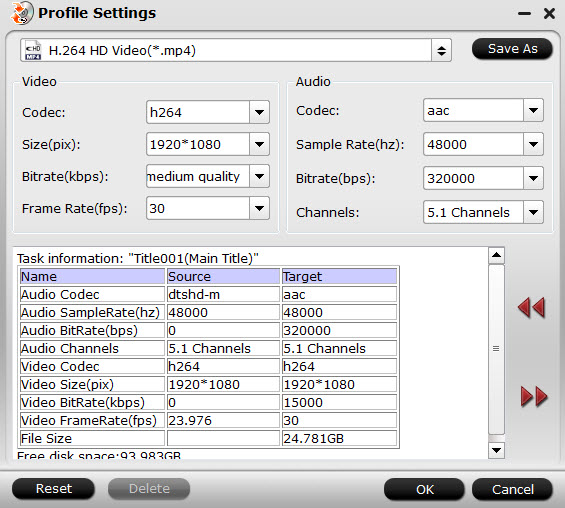 Tips: To store more Blu-ray movies in External HDD, you can lower video size and bitrate etc in the “setting”.Step 4: Start to convertClick Convert button to rip Blu-ray to MP4. Afterwards, locate the created video in output folder. There you get the job done. You can backup Blu-ray to External HDD successfully and stream it on PC/Car TV for watching in recreational vehicle.Related Articles: