The way watching and enjoying 3D AVCHD on PC and Mac


You may have got a 3D camcorder which record AVCHD videos, because Sony and Panasonic camcorders mainly use AVCHD as the recording video format. After recording, you may want to convert 3D AVCHD to MP4 or AVI format for playback or editing, at this time, you need a 3D AVCHD to MP4/AVI converter, or a anaglyphic 3D converter to convert recorded 3D files, Pavtube MTS Converter can help you, it has added 3D conversion feature, below is a brief guide for you to convert 3D AVCHD video to AVI/MP4 format. 
Nowadays 3D camcorders are becoming cheap and popular, many people take a Sony or Panasonic camcorder to record beautiful moments which in 3D. It gives us wonderful enjoyment. But for most of us, 3D camcorders record unusual AVCHD 3D videos may be new to us.  

1. Download and install Pavtube MTS Converter for Mac, it's an excellent 3D AVCHD converter for any player watch 3D.


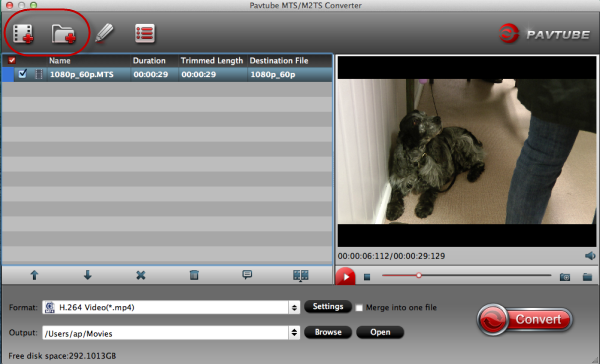
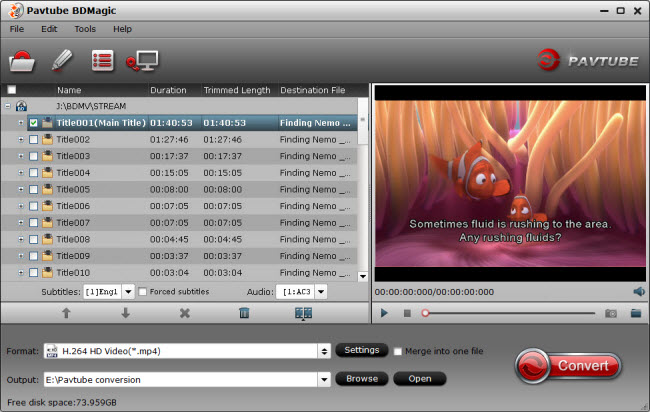
2. Run this 3D AVCHD to MP4/AVI converter, import the 3D AVCHD files to the software.

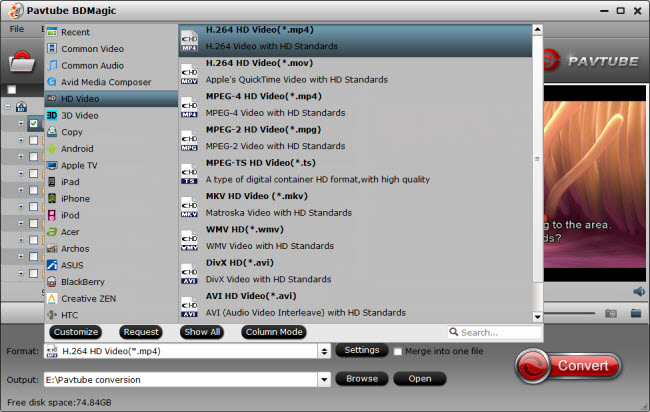
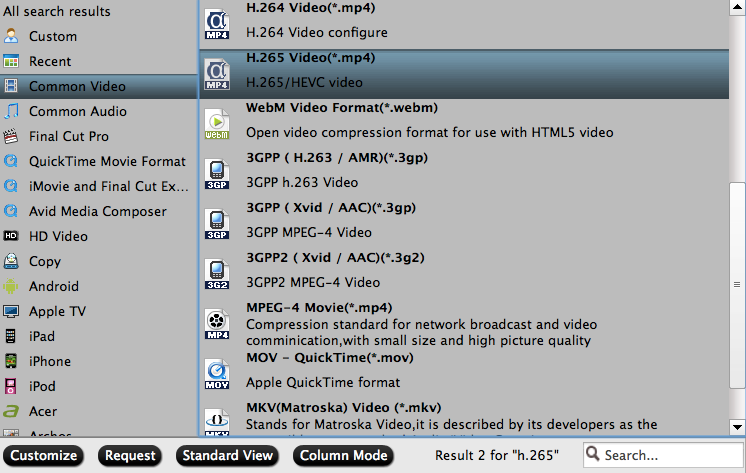
3. Click format bar to choose output format, just click and choose HD Video -> H.264 HD Video (*.mp4).

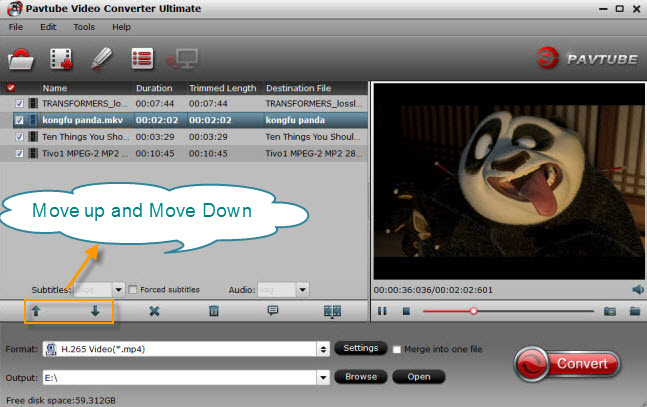
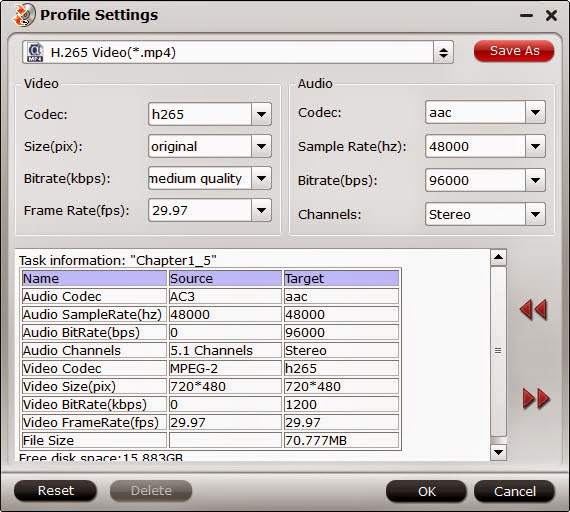
4. You can click settings button to adjust the output parameters as you want, adjust the video codec, resolution or audio parameters.


5. Click convert button to start.

After converting the 3D AVCHD videos to MP4/AVI format, you can watch 3D AVCHD on PCwith red and blue anaglyph glasses. The software supports many 3D camcorders, for example, it can convert Sony AVCHD video, convert JVC 3D video, convert Panasonic 3D video, etc. Now just download this 3D AVCHD to MP4/AVI converter and have a try, hope it can help you get better video enjoyment.
  • About AVCHD 3D:

AVCHD now supports a true 3D mode. Panasonic started shipping 3D cameras using 'side by side' encoding in 2010 and Sony joined the 3D race in March 2011 with Full HD 3D which means two video channels are used. The Sony approach uses a 50i or 60i video stream capturing 25 or 30 interlaced frames per second, per side.


More
Convert MXF for Watching on Zeiss VR One with iPhone 6
Solve the problem Can't Add MP4 to iTunes
Microsoft Surface Book Vs. MacBook Pro: Which One Deserves Your Dollars?
Get Nexus 6 and Nexus 9 to play purchased or rented iTunes movies
How to Crop Video Clips With VLC Media Player
How to convert Blu-ray/DVD for playback on the Roku 3 through USB stick
Play 3D Movies on VLC with No Trouble
How To Rip And Backup Blu-Ray On Mac OS X EI Capitan?

Src
The way watching and enjoying 3D AVCHD on PC and Mac


Play 3D Movies on VLC with No Trouble

VLC is the most popular as well as powerful free and open source tool in the market both in Mac and window based computer which is capable of playing virtually every file format that you can think of, like MOV, MPEG-1, MPEG-2, MPEG-4, DivX, mp3,… as well as 3D movies. If you are fond of watching 3D movies, Please check this Zone, you will find all solutions to play and edit 3D movies. 

Method 1. Play 3D movies with VLC itself. 

Start by opening your VLC player, then click’ Tools’ on the toolbar. Then go to ‘Effects and Filters’ to find ‘Video Effects’ . When you get into the interface, click the checkmark item as below: 


After you have the Rows set to 3 and Column set to 2. Once you’ve made your selection, you can enlarge it to full screen to enjoy your 3D movies. 

Additionally, we can adjust the ratio settings, with ‘Tools’ clicked, go to ‘All Settings’ you can see at the bottom of the screen. click ‘Custom Aspect Ratio’ and adjust it to 32:9. Close VLC and restart the program. 

Do you find the method a little complex with so many steps? Here we have another way of playing 3D movies on VLC. 

Method 2. With a good assistant-3D to VLC video converter for Windows, we can play any 3D movies on any devices and players at anytime anywhere, surely VLC included. 

Download and launch the program, load your 3D files with ‘Add video’ or ‘Add from folder’, then make the suitable choice for your original 3D movies to VLC compatible video format, such like ‘MOV Side-by-side 3D Video (*.mov)’. 


3D to VLC video converter for Mac— also a editor for 3D movies. Click the pencil icon and find more editing items for 3D videos, ‘Trim’ to when to start and when to finish, ‘Crop’ to get rid of the unwanted edges, etc. More you can get into the interface here. 

Additionally, it also support the DVD or Blu-ray’s conversion. If you get into the ‘Options’ menu, ‘Acceleration’ function is waiting for you too!(Only for Windows version) 

Except the two methods above, if got any other suggestions on playing 3D movies on VLC, you can leave us some comments at the end of this page. 


More 
Transfer iTunes Movies to Asus Zenfone 6/5/4 
Cannot Play MOV Videos On Surface Pro 3? 
Open Sony WX500 XAVC S Videos in VLC on Windows/Mac 
4K Video Converter - Enjoy 4K files on 4K HD TV 
Stream Blu-ray/DVD collections to Portable Devices and HDTV via Home Network 
Watch Recording Video via projector from NASWill the PS4 Receive 4K Videos? 
1080p movie playback with Roku 2 XS, Roku XDS, and Roku HD-XR via USB connection 
Top 8 HD/4K Video Converters with $9.9 After Christmas Sales & Deals 2015 

Src 
Play 3D Movies on VLC

Top 3+3 DVD Rippers Review for Mac El Capitan 10.11.1/10 11.2

Home theater has become more and more popular, and more and more people has built up their own home theater to enjoy movies with their family on weekends or on free time. Backing up DVD discs in a digital format to home theater is necessary. To help DVD fanciers get the best DVD ripper to backup DVD to home theater, I will list top 3+3 DVD ripper for Mac EL Caption 10.11.1/10 11.2.

Why need a DVD ripper?

1. It allows you to backup DVD to storage devices. For example, to backup DVD to WD My Cloud Mirror, you can enjoy movies in bedroom, bathroom, or kitchen etc. Besides, you can backup DVD to External Drive to enjoy movies on laptop while traveling. What is more, upload DVD to QNAP NAS can allow you share movies with your family.

2. It allows you to copy DVD to gaming console, such as Sony PS4. So you can enjoy DVD movies on projector via PS4 through HDMI connection.

3. It allows you to rip DVD to set-top streaming box or media player for watching DVD movies on Sony/Samsung/LG TV etc. For example, you can watch DVD movies via Kodi on Samsung TV, or to watch DVD movies via Apple TV.

4. It allows you to remove all DVD copy protection, region code, Disney code, Sony code etc for watching on all media players freely.

5. Backing up DVD in digital format to protect DVD from scratching, damaging, losing etc.

Top 3 Free DVD Ripper for Mac El Capitan 10.11.1/10 11.2

1. Handbrake for Mac:

Supported OS:

From Mac OS X 10.6 to 10.11

PROS:

* The app is fast, can make the most of multi-core processors to speed up the process.

* It is completely open source and completely free.

* It’s simple, easy to use, easy to install, and offers a wealth of tweaking options to get the best possible file as a result.

* It is designed with preset profiles for Apple iPhone, iPad, iPod, Apple TV, Android and WP8.

* It provides numerous video and audio parameter settings for users to alter file size and video quality.

* it supports MP4, MKV, H.264, MPEG and MP3 formats

CONS:

* It can not rip DVD with unencrypted-protection methods including CSS.

* The output files formats are very limited, which can’t meet all people’s needs.

* It is complicated to set an output device preset and it is hard to understand some options.

* Batch video conversion, only available on HandBrake 0.9.5 or later, has a complicated process

Learn more : HandBrake For Mac Alternative

2. MakeMKV for Mac

Supported OS: 

Mac OS X 10.6 and above

PROS:

* Reads Blu-ray discs protected with latest versions of AACS and BD+

* Preserves all video and audio tracks, including HD audio

* Preserves all meta-information (track language, audio type)

*Fast conversion - converts as fast as your drive can read data.

* No additional software is required for conversion or decryption.

* Functionality to open DVD discs is free and will always stay free.

CONS:

* Program is time-limited -- it will stop functioning after 60 days. You can always download the latest version from makemkv.com that will reset the expiration date.

* HD-DVD support is limited - some discs may fail to open and not all audio and subtitle tracks will be preserved.

* It can only output files in MKV format, which is not compatible for most media player and can not meet all users’ needs.

3. Pavtube Free DVDAid for Mac

Supported OS:

Mac OS X 10.9 Mavericks, 10.8 Mountain Lion, 10.7 Lion, Snow Leopard10.6, Leopard 10.5

PROS:

* Convert DVD disc, DVD folder, and DVD ISO/IFO to AVI, MPEG, MKV, MOV and many other video/audio formats with few clicks.

* Choose the preferred audio track and subtitles for saving in output DVD movie to get better enjoyment.

* Just one-click to rename and distinguish the output file; and set output destination freely on your Mac hard drive or directly to NAS server.

* With a built-in video editor, it could rotate videos, apply special visual effects, change the video parameters, trim, cropping, add subtitles, watermarks and more.

CONS:

* This app only offers optimized format for mainstream devices, there are still some devices are not in the support list.

Top 3 Paid DVD Ripper for Mac El Capitan 10.11.1/10 11.2

Pavtube ByteCopy for Mac

Supported OS:

Mac OS X 10.11 El Capitan, Mac OS X 10.10 Yosemite, 10.9 Mavericks, 10.8 Mountain Lion, 10.7 Lion, 10.6 Snow Leopard, 10.5 Leopard

PROS:

* With its advanced techniques and frequent updates, almost all latest DVD movies can be easily converted to suit your needs for entertainment.

* Rip or backup DVD disc to H.265/HEVC codec for better storage, playback and online streaming.

* Freely convert DVD disc, DVD folder, DVD ISO, DVD IFO to MP4, MOV, MKV, AVI, M4V, and any other video and audio formats you like.

* Create 3D videos out of source 2D DVD to enable users watch movies in 3D on any 3D devices with ease.

* Compress a DVD to MKV, MP4, MOV, Apple ProRes MOV with multiple languages and subtitles for free switch during playback.

* Easily adjust video codec, video bitrate, display ratio, frame rate and other settings to get best video/audio quality.

* With the built-in video editor, you are able to create personal movie by trimming part of whole movie, cropping black bars, inserting SRT subtitles, adding watermarks and special video effects.

CONS:

* It is a closed-source. If you use its free trial version, your output video will have the water marker in the middle.

Pavtube BDMagic for Mac

Supported OS:

Mac OS X 10.11 El Capitan, Mac OS X 10.10 Yosemite, 10.9 Mavericks, 10.8 Mountain Lion, 10.7 Lion, 10.6 Snow Leopard, 10.5 Leopard

PROS:

* More than DVD disc supported, DVD folder, DVD ISO/IFO can be easily loaded; more than 200 profiles are listed under the Format menu, including H.264 MP4, MKV, M4V, MOV, AVI, etc.

* Convert DVD disc to H.265/HEVC codec to store with high quality in small file size, play on Mac with VLC, Divx player, PotPlayer or stream online with Wowza Streaming Engine.

* Frequently update of Format list with adding new devices to assure you to locate the optimized presets for the destination portable devices, media players, game consoles, or video editing software.

* To get better movie playback on your devices, free to trim a short clip out of original movie, crop black bars from images, insert external SRT.ASS/SSA subtitles, add video effects and more.

* You are allowed to optionally set video and audio parameters to achieve the best video and audio enjoyment during playback.

CONS:

It can only convert DVD ISO files to other formats, while do not support convert other formats to ISO files.

Pavtube DVDAid for Mac

Supported OS:

Mac OS X 10.11 El Capitan, Mac OS X 10.10 Yosemite, 10.9 Mavericks, 10.8 Mountain Lion, 10.7 Lion, 10.6 Snow Leopard, 10.5 Leopard

PROS:

* Rip DVD disc, DVD folder, and DVD ISO/IFO to MP4, MPEG, H.264, MOV, WMV, MKV, AVI, M4V and many other SD, HD format and even the new H.265/HEVC formats

* Convert DVD to playable file type for iPad, iPhone, Smasung Galaxy Tab, Nokia, Google Nexus, HTC, Android smartphones, tablets, etc.

* Copy the entire disc with original DVD structure to the Mac hard drive for storage of DVD re-creation;

* Backup a complete 100% DVD VOB movie without extracts.

* It offers you a practical way to rotate videos, apply special visual effects, change the video parameters, trim, cropping, add subtitles, watermarks and more.

* Pick up the preferred audio track and subtitles for saving in output DVD movie to get better enjoyment.

CONS:

* The program only provides optimized preset format for mainstream devices.

Conclusion:

To use a free DVD ripper to backup unprotected DVD, HandBrake is no doubt a great choice for you. While, if your DVD disc is under protection and you want your ripped DVD movies compatible widely, then a paid DVD ripper or Pavtube Free DVDAid is your best choice.

Related Articles:

Watch Recording Video via projector from NAS

Do you want to have a birthday party while do not know what to do to make your party special. Now, I will give you a pretty cool idea. Playing your past year’s funny or touching recording videos via projector for enjoying with your family and friends. Do you also get touched, while do not know how to achieve the cool idea on your party. Do not be worried, I will give an easy way to ensure you do the job on your own.

First of all, one thing we should keep in mind is that some recording videos taken from camera may be in projector incompatible format, like .MTS/.MXF which is not supported by projector. So to watch projector unsupported recording videos via projector, you gonna need a Video ConverterPavtube Video Converter Ultimate is your best choice. With it, you can convert all projector unsupported recording videos formats to projector support format. Besides, you can attach SRT/ASS/SSA subtitles for source video. What is more, it allows you to set video display ratio, bitrate, frame rate and other settings to obtain the best video and audio playback on projector. Moreover, you can trim video length, crop video size, split large video into segments and adjust video effect to create your personal special videos.

Then after conversion, you can store your converted recording videos to NAS. So that, you are freely to watch recording videos via projector from NAS. Next is a guide for you to watch recording videos via projector from NAS.

Free download and install
          

Other Download:
- Pavtube old official address: http://www.pavtube.cn/blu-ray-video-converter-ultimate/
- Cnet Download: http://download.cnet.com/Pavtube-Video-Converter-Ultimate/3000-2194_4-75938564.html

Steps to convert projector unsupported recording videos to MP4

Step 1. Load recording videos

On the top menu bar, click "File" > "Add Video/Audio" icon to import recording videos to the program. You can also directly drag and drop the files to the app.


Tip 1: On the main interface, you can check  option to combine all your separate video clips into one single file.

Tip 2: The app allows you to batch convert your videos to save your much time.

Step 2: Set output format

From "Format" drop-down list, specify "HD Video" > "H.264 HD Video(*.mp4)" as the output format for projector playing. 


Tip 3: Profile parameters can be customized in “Settings”, including video codec, file size, bitrate, frame rate, audio sample rate, audio channels, etc. to get a satisfying video/audio playback.

Tip 4: If the recording video has black area and you want crop it. You can click “Edit” and video editor interface will appear. Inside it, you can crop the black area, trim footage and adjust video effect.


Step 3: Start to convert

Go back to the main interface, click "Convert" button under the video preview window to start the video conversion process.

When the conversion is done, you can transfer the converted videos to NAS, and then watch your converted recording videos via projector from NAS. Apart from it, the converted video in NAS can also transfer to Xbox 360, Roku, TV, iPad Pro etc.

Related Articles:

Backup Blu-ray to HP Envy Laptop

HP Envy Laptop have up to 9.5 hours of battery life, which means it allows you to enjoy blu-ray movies during a long traveling without quitting. However, you may have two problems when playing Blu-ray files on HP Envy Laptop during traveling:

1. HP Envy Laptop does not have a Blu-ray drive, which refuses it to play Blu-ray directly. 

2. It would be cumbersome if you have to carry your Blu-ray discs around during traveling.

So to play Blu-ray discs on HP Envy Laptop and get rid of Blu-rays, you can backup your Blu-rays to HP Envy Laptop firstly before traveling. If you have a large number Blu-ray movies to backup, you can backup them to USB Hard Drive, and then watching Blu-ray movies on HP Envy Laptop via USB.

There are many Blu-ray Backup Tools in the market, and after comparing all the tools, I recommend you Pavtube BDMagic. With it, you can backup Blu-ray in any video formats you want, like: MP4, MOV, AVI, H.264, H.265/HEVC, M3U8 etc. It can also remove all Blu-ray copy protection, region code, Sony code, Disney code etc. Besides, it allows you to adjust video/audio parameters including size, bitrate, frame rate, etc. to lower your converted Blu-ray video files size.(Review

Free download and install: 


Other Download:
- Pavtube old official address: http://www.pavtube.cn/blu-ray-ripper/
- Cnet Download: http://download.cnet.com/Pavtube-BDMagic/3000-7970_4-75922877.html 

Steps to Backup Blu-ray to HP Envy Laptop in MP4

Step 1. Load Blu-ray movies

Download the best Blu-ray Converter, install and launch it on your PC. Then click the "File" > "Load From Disc" icon to load source Blu-ray files from your local computer to the program. You can also directly drag and drop the Blu-ray files to the app.


Tip 1: On the main interface, you can check  option to combine all your separate Blu-ray video clips into one single file.

Tip 2: Click the "Move up" or "Move down" arrow under the video file displaying window to adjust your source video file order according to your own needs.

Tip 3: If there are several language subtitles in your Blu-ray movies, you can select the language subtitle you want to show in your movie by “Subtitle”. 

Step 2: Set output format

In drop-down format list, choose “HD Video” > “H.264 HD Video(*.mp4)” as output format for HP laptop. Of course, you also can choose AVI, MOV for your needs. 


Tip 4: If the source movie has black area and you want crop it. You can click “Edit” and video editor interface will appear. Inside it, you can crop the black area, trim footage and add watermark.


Step 3: Customize output video and audio quality

Profile parameters can be customized in “Settings”, including video codec, file size, bitrate, frame rate, audio sample rate, audio channels, etc.

Tip 5: Keep in mind the file size and video quality is based more on bitrate than resolution which means bitrate higher results in big file size, and lower visible quality loss, and vice versa. You can preview the size at the below chart.

Step 4: Start to convert

After all settings done, hit on the “Convert” button to start to backup Blu-ray to laptop with the better video quality and small video size. After the conversion completes, open output folder and you will find the converted movies. 

After coping Blu-ray to your HP Envy Laptop, you can freely watch converted Blu-ray. Just try this amazing Blu-ray Backup tool and enjoy convenience Blu-ray playback on your HP Envy laptop during traveling.

Related Articles:

How to Stream ISO image on Amazon Fire TV 2 via NAS?

It’s becoming very common these days for people to backup their Blu-Rays. While, the video format copied from Blu-ray is ISO format, which have big video size and is incompatible with most Smart TV. So, to play your ISO images on Smart TV, like LG TV, Sony TV and Panasonic TV via Amazon Fire TV 2 for enjoying better on a big screen, you can convert ISO to Amazon Fire TV 2 compatible H.265/HEVC MP4 format, and then stream converted ISO images on Amazon Fire TV 2 via NAS for watching on TV.

To convert ISO video to MP4 in H.265, you should use a video converter to finish the conversion for a better enjoyment on TV via Amazon Fire TV 2. In fact, there are a few video converters in the market which can finish the conversion from ISO to H.265/MP4. Pavtube Video Converter Ultimate is the best of all the softwares.

Highlights of the app:

1. Rip your favorite Blu-ray ISO movies to HEVC/H.265 MP4 with best quality and fast speed.  
2. It supports to convert Blu-ray movies, Blu-ray Folder, Blu-ray ISO Image File, DVD movies, DVD Folder, DVD IFO File, DVD ISO Image File to HEVC/H.265
3. You are now able to create videos in H.265/HEVC in 5.1 surround sound
4. You could optionally set video display ratio, bitrate, frame rate and other settings to obtain the best video and audio playback.
3. You are allowed to trim video length, crop video size, split large video into segments, add watermarks, adjust video effect to create personal movie.

The program has both Windows and Mac version, Mac users can switch to download Pavtube iMedia Converter for Mac on Mac OS X El Capitan.

Free download and install
          

Other Download:
- Pavtube old official address: http://www.pavtube.cn/blu-ray-video-converter-ultimate/
- Cnet Download: http://download.cnet.com/Pavtube-Video-Converter-Ultimate/3000-2194_4-75938564.html

Steps to convert ISO image in H.265 to Amazon Fire TV 2 via NAS

Step 1. Load ISO image

Launch and start the program on your computer, click "File" > "Load IFO/ISO" to import source files to the program. You can also directly drag and drop the files to the app.

Tip 1: Click the "Move up" or "Move down" arrow under the video file displaying window to adjust your source video file order according to your own needs.


Tip 2: On the main interface, check  option to combine all your separate ISO video clips into one single file.

Step 2: Set output format

Click on the dropdown menu of "Format" and then move your pointer to "Common Video" > "H.265 Video(*.mp4)" as the output format. Or you can choose "HD Video" > "H.265 HD Video(*.mp4)".


PS. Only 4K TV can support H.265 MP4 format, so if your TV is not 4K TV, then you should choose "Common Video" > "H.264 Video(*.mp4)" as the output format.

Step 3: Customize output video and audio quality

You can click the “Settings” button on the main interface to adjust the profile parameters such as video size, video & audio bitrate, frame rate, etc to meet your own demands. Keep in mind the file size and video quality is based more on bitrate than resolution which means bitrate higher results in big file size, and lower visible quality loss, and vice versa.


Step 4: Start to convert

Tap "Convert" button on the main interface to start converting Blu-ray ISO movies to H.265/H.264 MP4 formats. After the conversion, click "Open" to locate the result videos.

Now, you can enjoy your converted ISO video as MP4 format in H.265 on 4K TV via Amazon Fire TV 2 from NAS, or as MP4 format in H.264 on any TV via Amazon Fire TV 2 from NAS.

Related Articles:

DVD Ripping Software-2D 3D Movie Tips - 2016 Top


DVD playback will never be limited in DVD Drive and professional DVD Player. There are many people watching their DVD movies on TV, PC, Tablet, iPad in Home Theater via NASPersonal Cloud Storage,Chromecast. Rich media playback solutions riches the media life. However, only if you want to separate your DVD playback from DVD drive/player, you need to rip DVD to digital video format. And the work is based onDVD Ripper 


However, there are plenty of great utilities designed to rip DVD discs and and give you popular video that are playable on any device you choose, whenever you choose to watch them. Too many choices makes no choice. Many people just get a headache when they need to select only one in hundreds. Here are three of the best 2016, based on thousands consumers’ nominations. 

2016 Best DVD ripper #1: Handbrake 

OS Platform: Windows & Mac & Linux 


Key features: Handbrake is our favorite video encoder for a reason: it’s simple, easy to use, easy to install, and offers a wealth of tweaking options to get the best possible file as a result. If you’re daunted by them, you don’t even have to use them—the app will compensate for you and pick some settings it thinks you’ll like based on your destination device. So many of you like Handbrake that many of you use it in conjunction with another app (like VLC, which makes ripping easy)—you’ll let another app do the rip and crack the DRM on your discs, and then process the file through Handbrake for encoding. 

Pros: The app is fast, can make the most of multi-core processors to speed up the process, and is completely open source. Best of all, it’s completely free. 

Cons: Only outputs MP4, MKV formats. Only can rip unencrypted DVD. Handbrake isn't updated often. Its presets are often out of date. 

Editor’s note: Since it is free, I think I will choose it first if I need a DVD Ripper. After all, MP4 is enough for nearly all devices and media players

2016 Best DVD ripper #2: Pavtube ByteCopy 

OS Platform: Windows & Mac 


Key features: Pavtube ByteCopy is your best DVD copying and backing up tool which can rip and backup DVD in any copy protection like Sony, Disney and region codes. It can convert DVD to any other formats like H.265, M3U8, MP4, MOV , M4V, AVI, WMV, MPG, MKV, etc or MP4/MOV with multi-track audios for playback on iOS/Android/Windows Tablets/Phones, HD Media Players (WDTV), editing software (Avid Media Composer, Adobe Premiere, etc.), and more. 

And other than that, Pavtube ByteCopy is also able to encode DVDs to MKV container format with preserving chapter markers, multiple audio tracks and subtitles and make it possible for you to easily select your needed tracks, subtitles when watching DVD movies with your media players. creating 3D video is supported by ByteCopy. What’s more, it also can rip and copy Blu-ray. 

Pros: A top Multi-track Blu-ray/DVD Converter to all of you with excellent ability to pick up multi-track for playing BD/DVD movies on Media Players and portable device. It also can extract subtitle/audio from Blu-ray/DVD. 

Cons: It is a paid one. If you want to use its free trial version, you have to bear the watermark in the middle of the video. 

Editor’s note: If I need a more powerful DVD Ripper, Pavtube ByteCopy is no doubt the best choice. But if I only need to rip DVD to MP4 and my DVD has no encryption, I will definitely select Handbrake. 

2016 Best DVD ripper #3: MakeMKV 

OS Platform: Windows & Mac & Linux 


Key features: We’ve praised MakeMKV before for its ability to quickly and easily rip DVDs to high quality MKV files with a single click. The app has been in beta for a long time (years, in fact), which is just as well, since the developers promise to start charging for Blu-ray ripping once the app leaves beta. The app’s strong suits are that it’s fast, super easy, and cross-platform. 

Pros: The app preserves all of the source disc’s information, including tracks, chapters, HD audio, menus, and so on. The app is completely free. 

Cons: Only MKV output. 

Editor’s note: I found little software will keep multiple audio and subtitle tracks when ripping BD/DVD discs. But MakeMKV and Pavtube ByteCopy must be in the list. 

At the end of the day, DVD rippers are applications that set your movies from discs and allow you to have digital copies of the content that you’ve paid for. And please keep in mind, only personal usage of the DVD rips is legal. 


More 
Install Connect Your Galaxy Tab To A Mac Computer Using Mac Kies 
Rip 3D Blu-rays to Plex Server for playback with 5.1 channel on TV via Raspberry Pi 
Blu-ray to Galaxy - Rip Blu-ray to Play on Samsung Galaxy A8 for Freely 
M2TS to PS4 - Convert Blu-ray M2TS to PlayStation4 
ATV 3 MKV best approach-Get MKV videos to play on Apple TV 3 without problems on Mac 
Digitize your Blu-ray/DVD movies for playing on Amazon Fire TV 
Copy Movie DVDs to 25 terabyte Drobo DAS Device for backup 

Src 
2016 Best 3 DVD Ripping Software-2D 3D Movie Tips